1. Tomcat总体架构
作为一个服务器,其最基本的功能就是接收其他计算机发来的请求数据并进行解析,完成相关业务处理,然后把处理结果作为相应返回给计算机,如上图所示。
但是把请求监听和请求处理放到一起扩展性很差,比如当我们想适配多种网络协议,但是请求处理却相同的时候。于是Tomcat将网络协议和请求处理从概念上进行分离。得到以下结构:
Connector负责开启Socket并监听客户端的请求,返回相应数据,完成与网络协议相关的操作;Container负责具体的请求处理。
以上只是Tomcat非常抽象的分层,具体情况随着了解的深入逐渐细化。
2. Connector
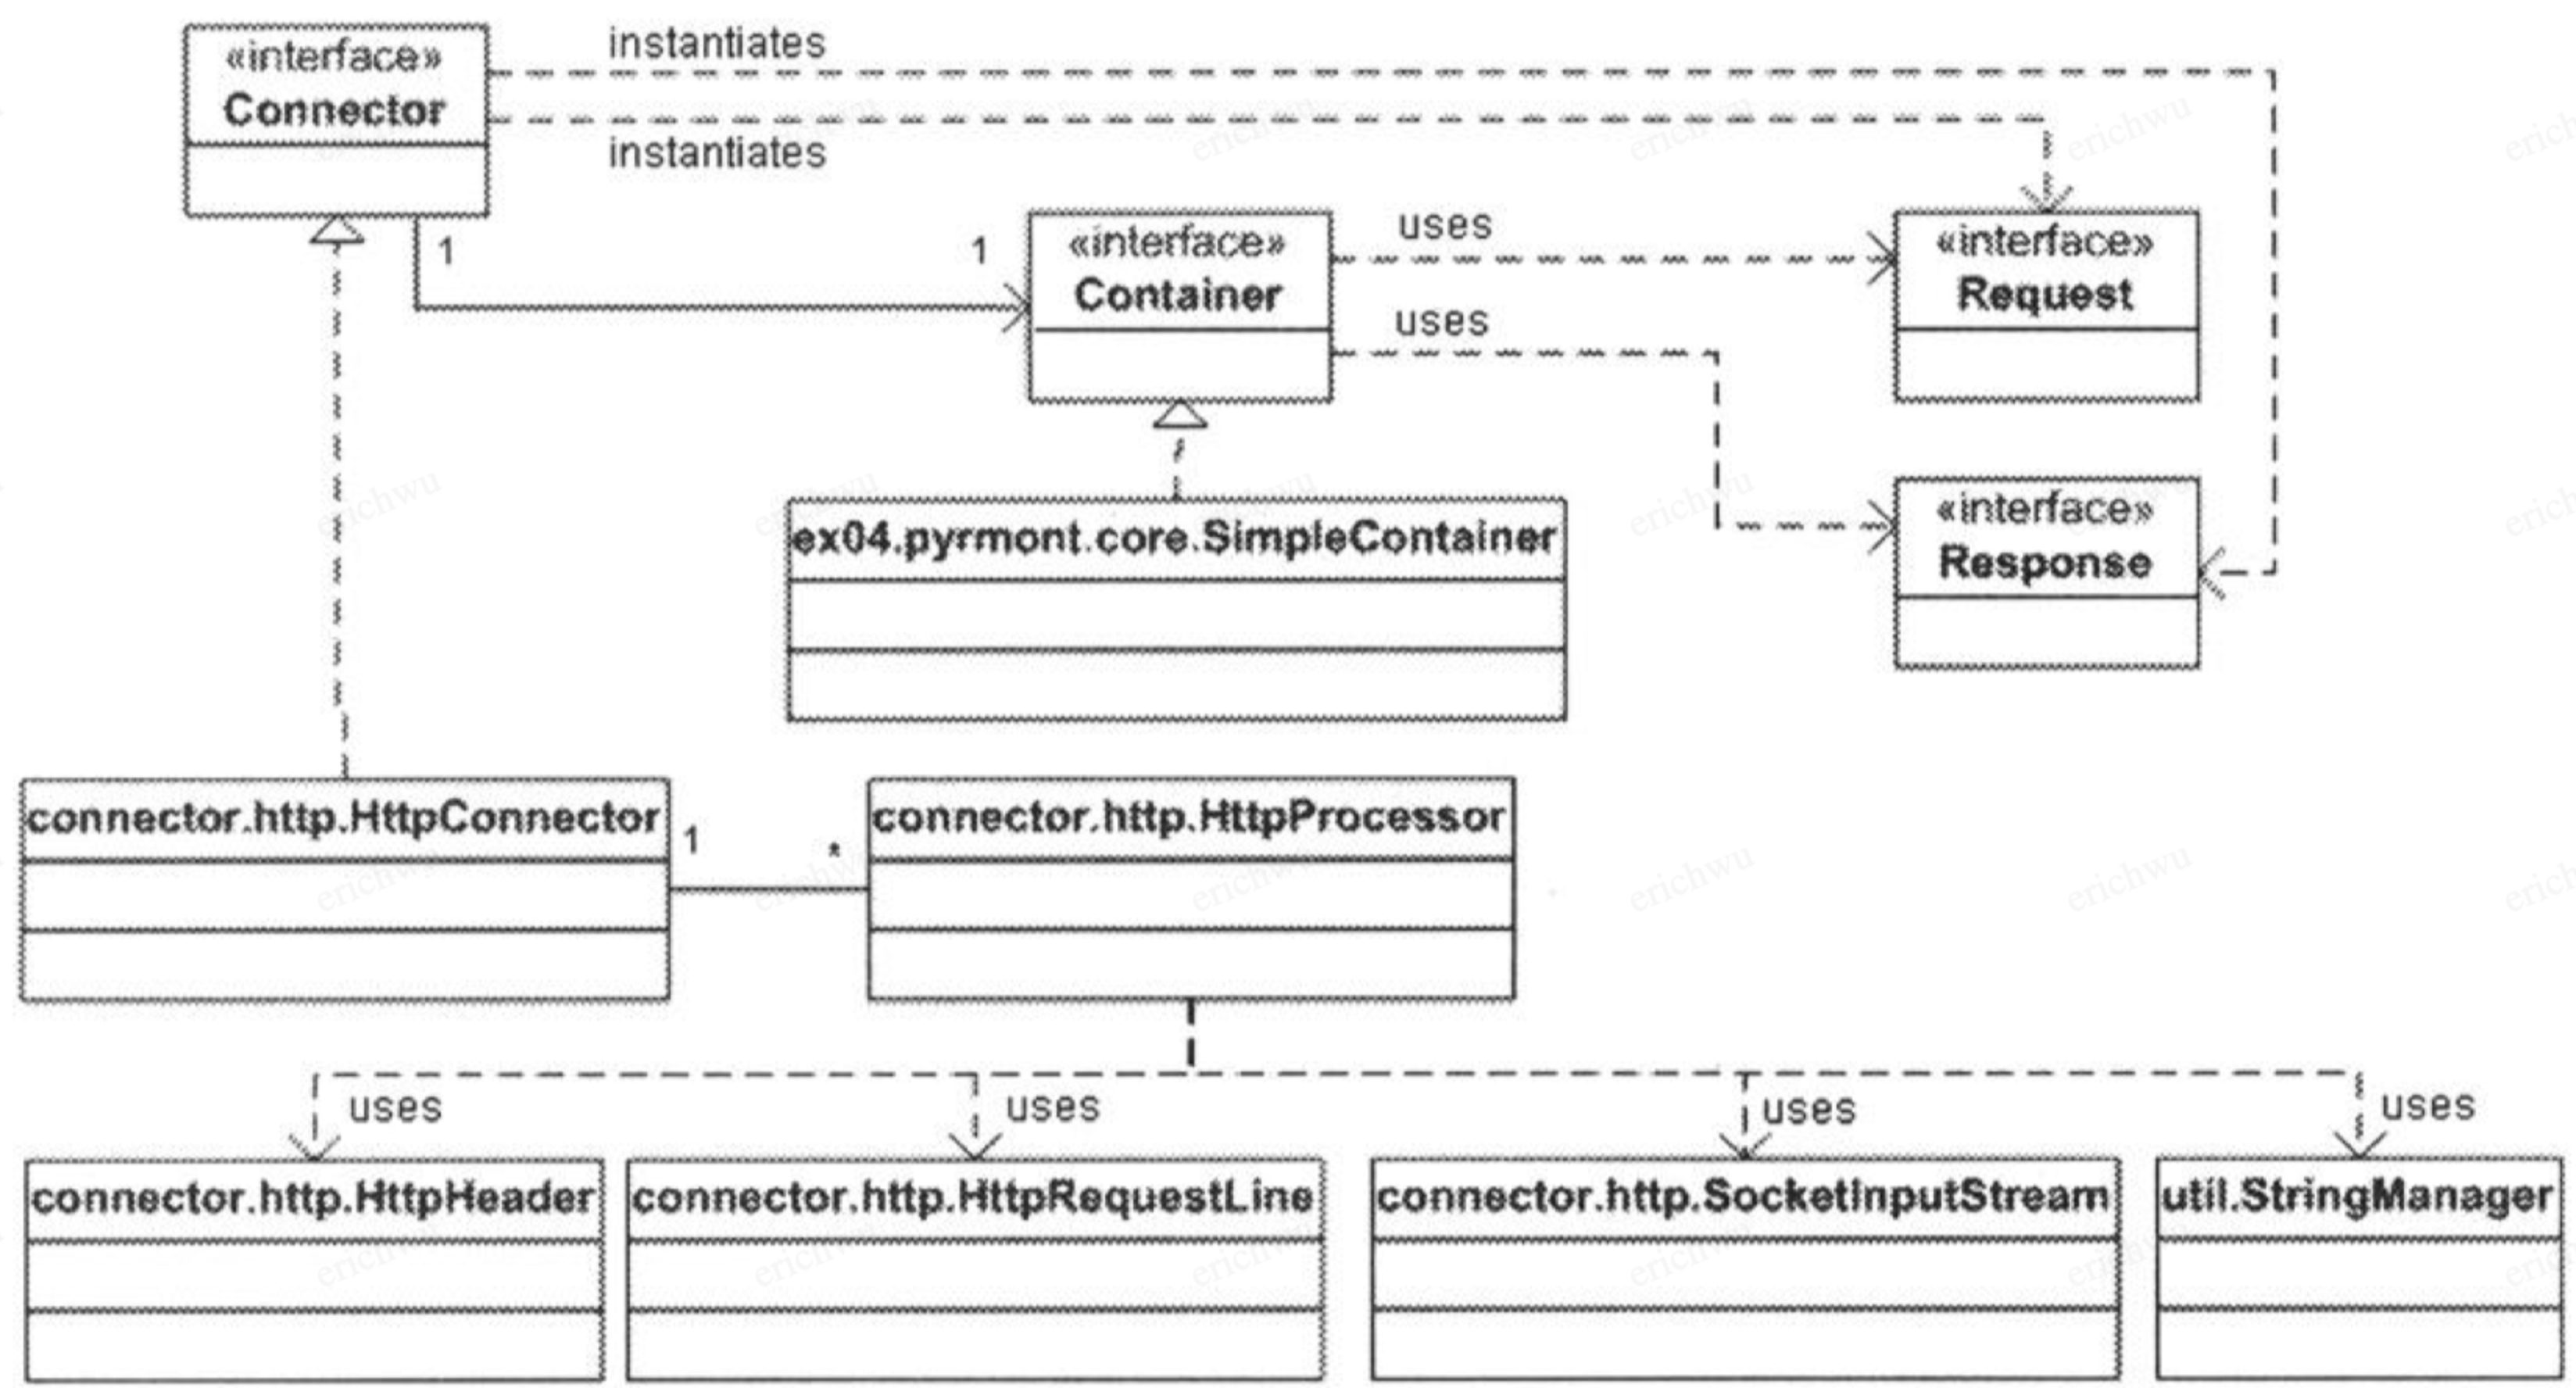
Connector和Container是一一对应的,并且Connector知道Container的存在,但是Container不知道Connector的存在;
- 初始化方法为initialize(),启动方法为start()
- 在初始化方法initialize()中,调用私有方法open得到一个ServerSocket;在该方法中没有使用ServerSocket的构造方法,而是调用了工厂方法,并产生一个ServerSocket类。
- 使用一个Stack维护一组HttpProcessor,一个HttpProcessoor在同一时刻会处理一个请求,每一个都有自己的线程。
- 在初始化方法start()方法中,会启动Connector的主线程,然后创建HttpProcessor到minProcessors;
- 在线程方法中,会使用serverSocket.accept()接收socket,然后使用createProcessor()得到一个HttpProcessor;大多数情况下,都会从Stack中获取HttpProcessor. 如果请求数量多于Stack中HttpProcessor的数量,则会创建新的HttpProcessor直至达到maxProcessors;如果maxProcessors为负数,则会无限创建。如果能得到processor则调用processor.assign方法。
2.1 HttpProcessor
HttpProcessor的实体用来读socket的输入流并且解析Http请求。HttpProcessor主要完成以下三个任务:
- 解析连接
- 解析请求
- 解析请求头
HttpProcessor的assign方法不能等待请求处理完成,需要直接返回。这里使用了一种委派任务模式。
synchronized void assign(Socket socket) {
    // Wait for the processor to get the previous socket
    while (available) {
        try {
            wait();
        }
        catch (InterruptedException e) {
        }
    } // Store the newly available Socket and notify our thread
    this.socket = socket;
    available = true;
    notifyAll();
}

synchronized Socket await(){
    // Wait for Connector to provide a new Socket
    while(!available){
        try{
            wait();
        }catch(InterruptedException e){
        }
    }
    // Notify the Connector that we have received this Socket
    Socket socket = this.socket;
    available = false;
    notifyAll();
    return(socket)
}
其中assign和await方法都是HttpProcessor的方法,但是这两个方法在不同的线程上被调用。这两个方法互相唤醒对方。
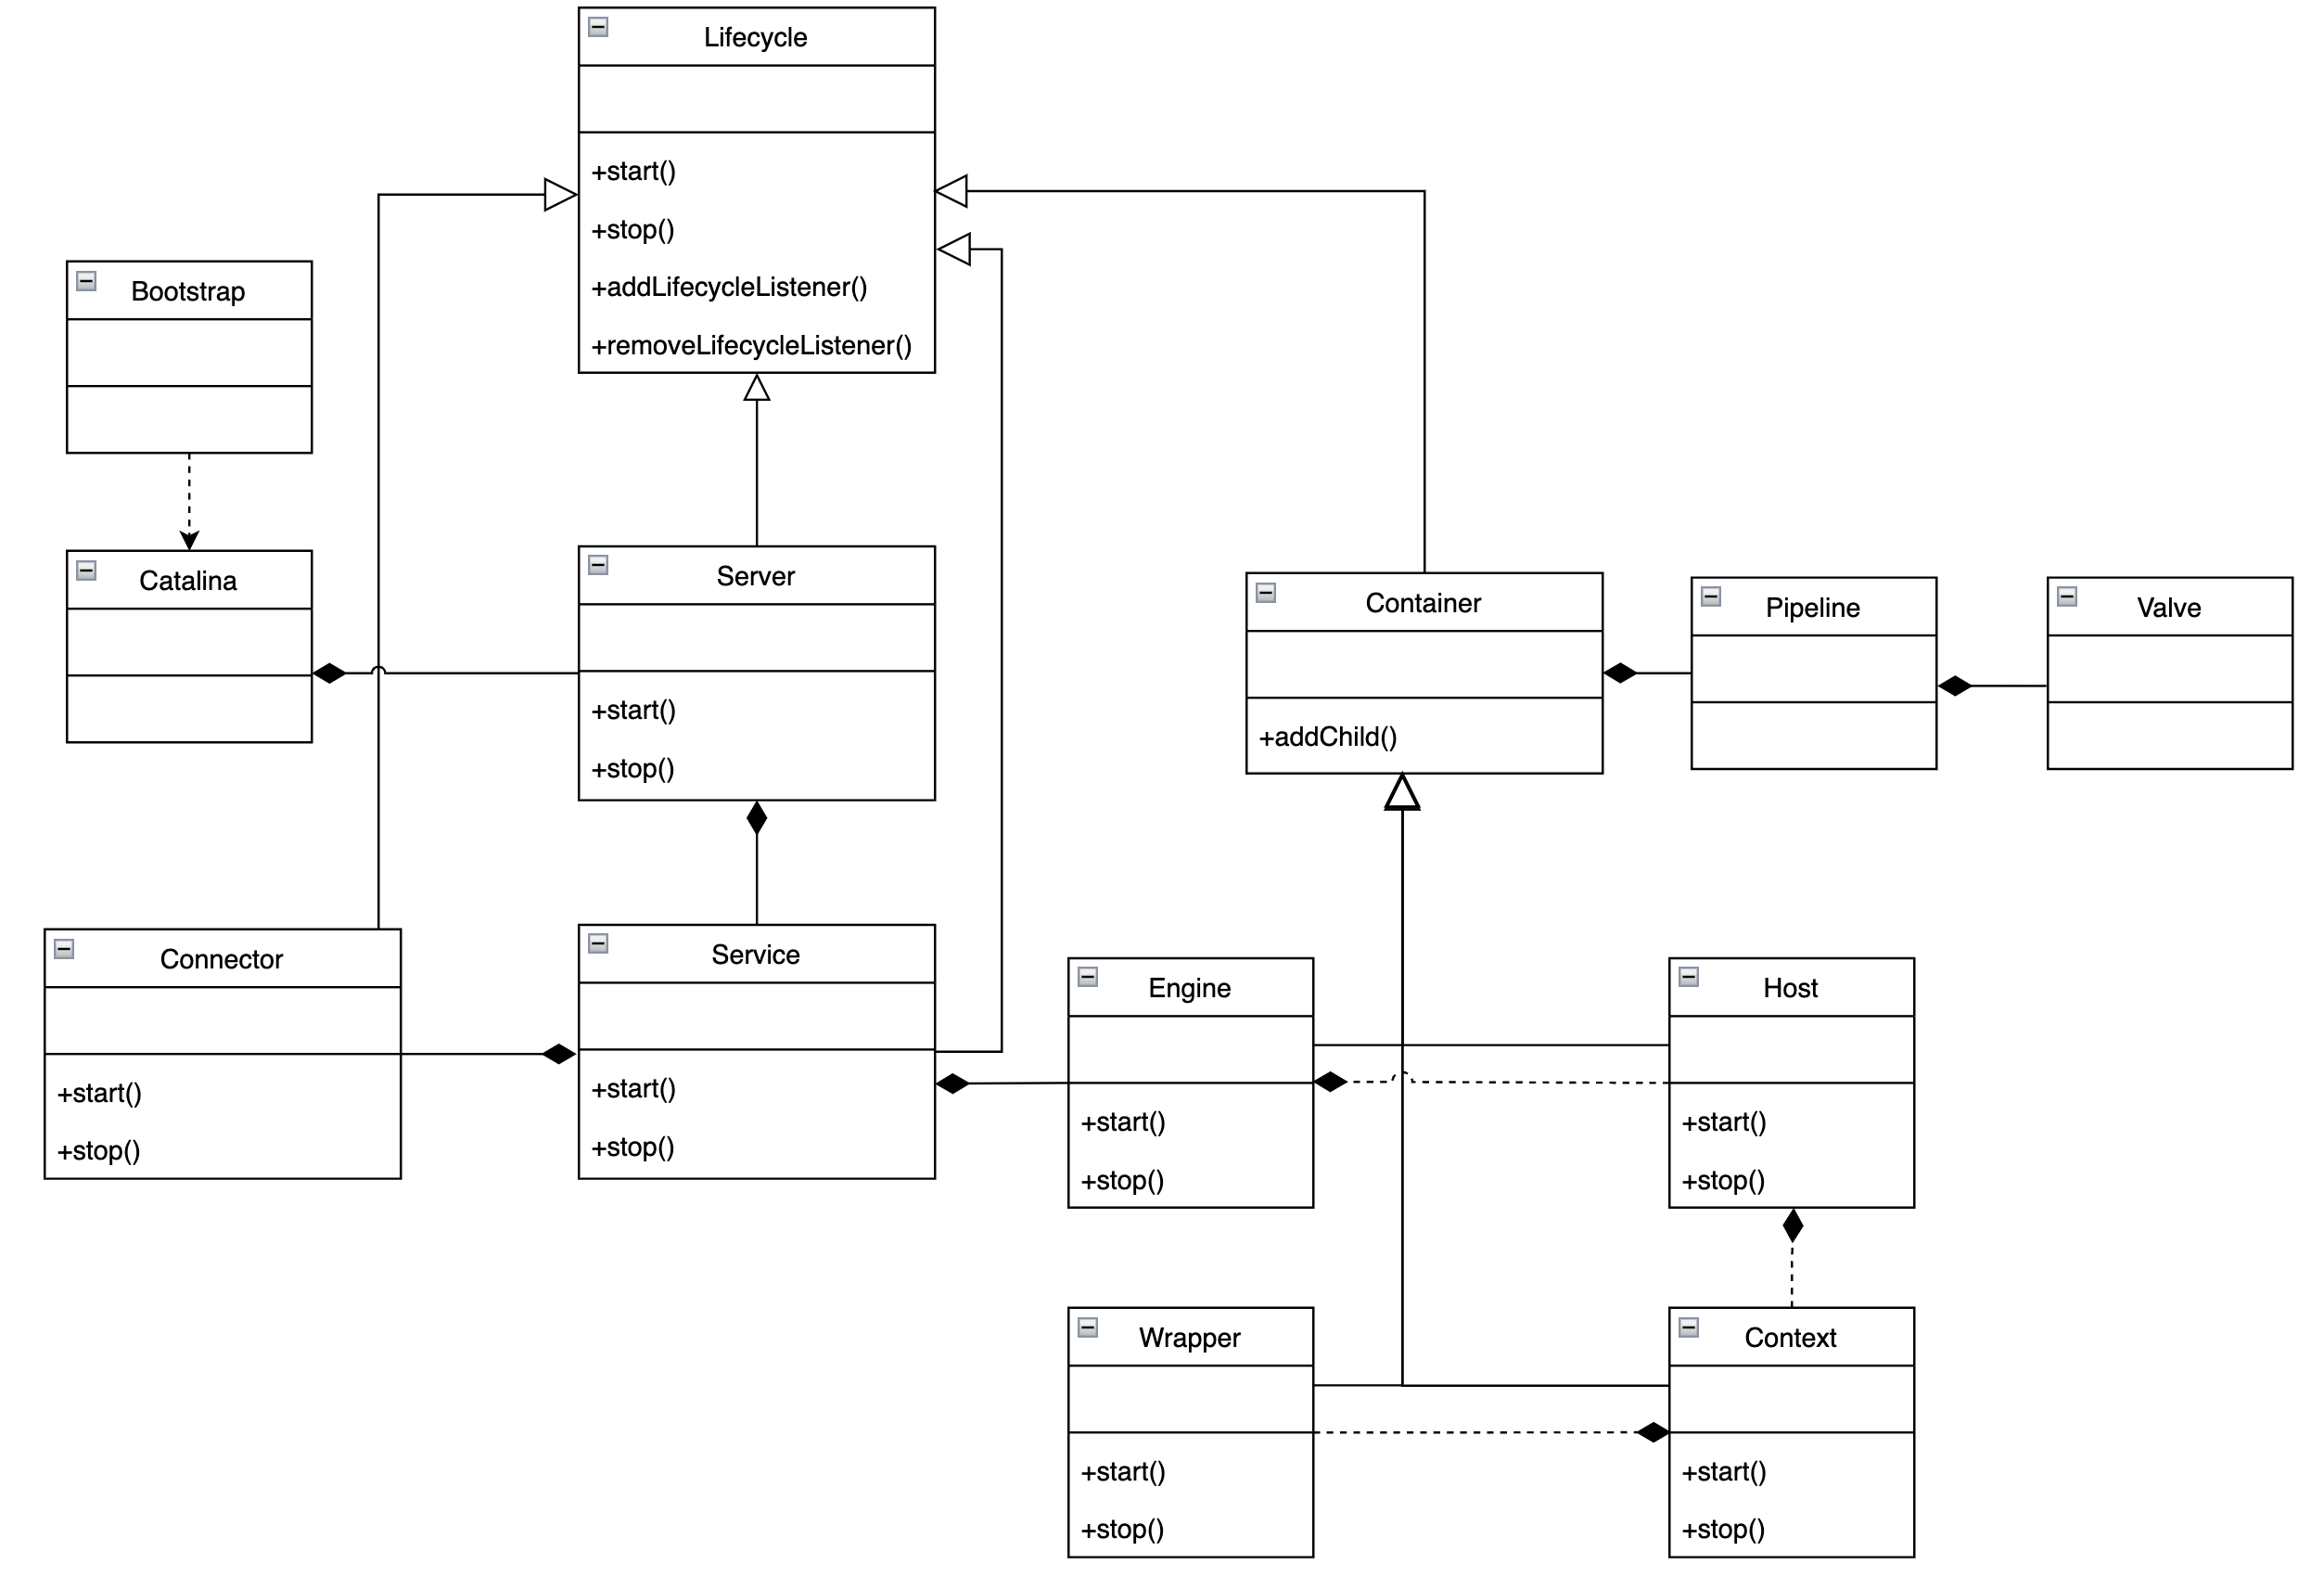
3. Container
Container对象是为Servlet处理请求并且将response对象返回给web客户端的。Container对象实现org.apache.catalina.Container接口,并且有四种类型: Engine, Host, Context和Wrapper,按照从高到低的层级:
- Engine:表示整个Catalina servlet引擎
- Host:表示一个虚拟主机
- Contex:表示一个web应用(比如Datatalk)
- Wrapper:表示一个独立的servlet(比如Datatalk的一个Controller)
高一层级可以持有多个低层级的Container。
3.1 Pipelining Tasks
在Container中,可以通过配置项来修改container的行为。这是因为Container内部使用了Pipeline的代码设计。
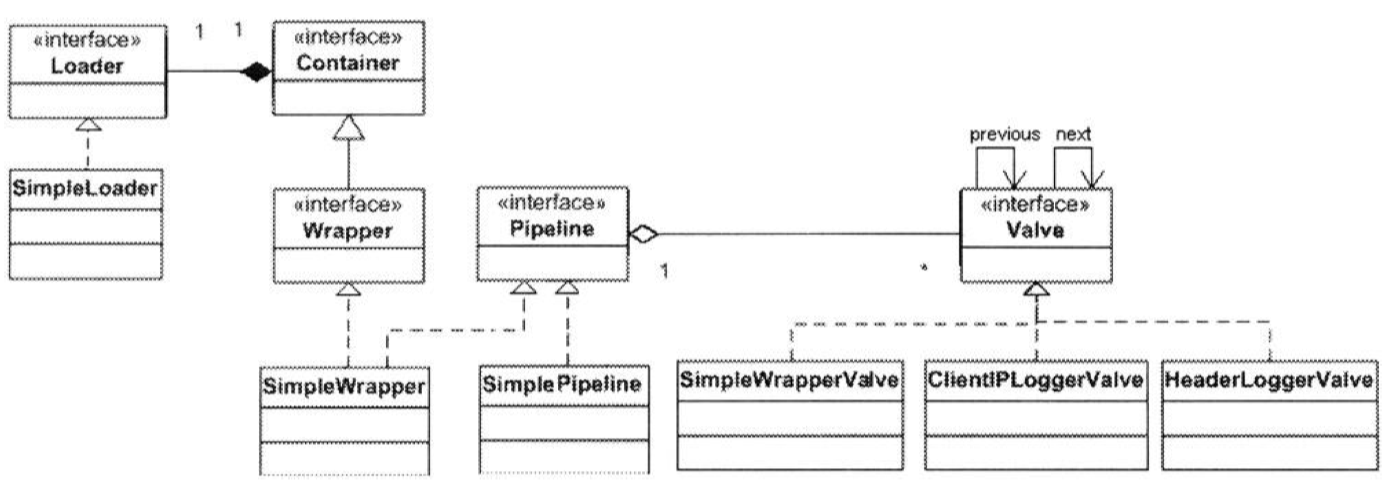
Container中持有一个Pipeline,pipeline中由持有Valve,如下图所示:
Pipeline的接口如下:
public interface Pipeline {

   /**
    * <p>Return the Valve instance that has been distinguished as the basic
    * Valve for this Pipeline (if any).
    */
    public Valve getBasic();

   /**
    * <p>Set the Valve instance that has been distinguished as the basic
    * Valve for this Pipeline (if any).  Prioer to setting the basic Valve,
    * the Valve's <code>setContainer()</code> will be called, if it
    * implements <code>Contained</code>, with the owning Container as an
    * argument.  The method may throw an <code>IllegalArgumentException</code>
    * if this Valve chooses not to be associated with this Container, or
    * <code>IllegalStateException</code> if it is already associated with
    * a different Container.</p>
    *
    * @param valve Valve to be distinguished as the basic Valve
    */
    public void setBasic(Valve valve);

    public void addValve(Valve valve);

    public Valve[] getValves();

    public void invoke(Request request, Response response)
        throws IOException, ServletException;

    public void removeValve(Valve valve);
}
可见通过该接口可以配置Valve。另外basic valve是一个特殊的valve,总是在最后执行。
我们当然可以通过以下代码实现Pipeline中Valve的依次调用:
protected Valve valves[] = new Valve[0];

for(int n=0;n<valves.length;n++){
  valve[n].invoke(...);
}
但是Tomcat的设计者使用了另外一种方式,引入了一个内部类ValveContext;该内部类可以访问Pipeline类的成员。
因此在Pipeline的invoke方法中,会首先初始化一个ValveContext,然后调用其invokeNext方法
public void invoke(Request request, Response response){
   (new SimplePipelineValveContext()).invokeNext(request, response);
}
ValveContext内部类:
protected class SimplePipelineValveContext implements ValveContext {

  protected int stage = 0;

  public void invokeNext(Request request, Response response){
    int subscript = stage;
    stage = stage + 1;
    if (subscript < valves.length) {
      valves[subscript].invoke(request, response, this);
    }
    else if ((subscript == valves.length) && (basic != null)) {
      basic.invoke(request, response, this);
    }
    else {
      throw new ServletException("No valve");
    }
  }
}
在调用valve的invoke方法时,会把自己传入到valve中,然后选择在合适的时机调用valveContext的invokeNext方法,执行下一个valve的invoke方法。其调用链如下图所示:
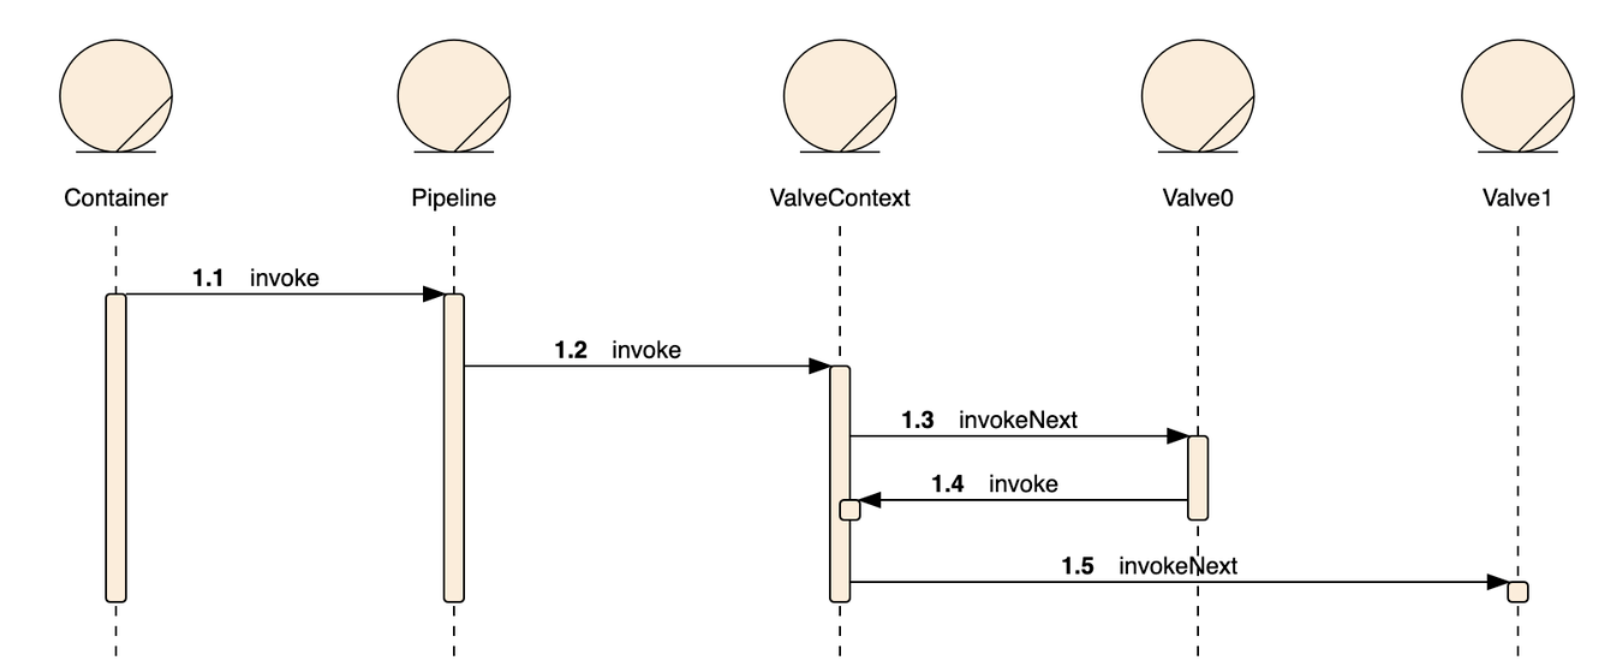
类如其名,Context持有Pipeline所有的Valve信息,并且自己维护了一个stage变量用于记录调用到了第几个Valve,把它称之为“Valve上下文”再合适不过了。
3.2 Wrapper
Wrapper中包含一个Loader,该Loader用于查找并加载Servlet。可见一个Wrapper中也只有一个Servlet。
3.3 Context
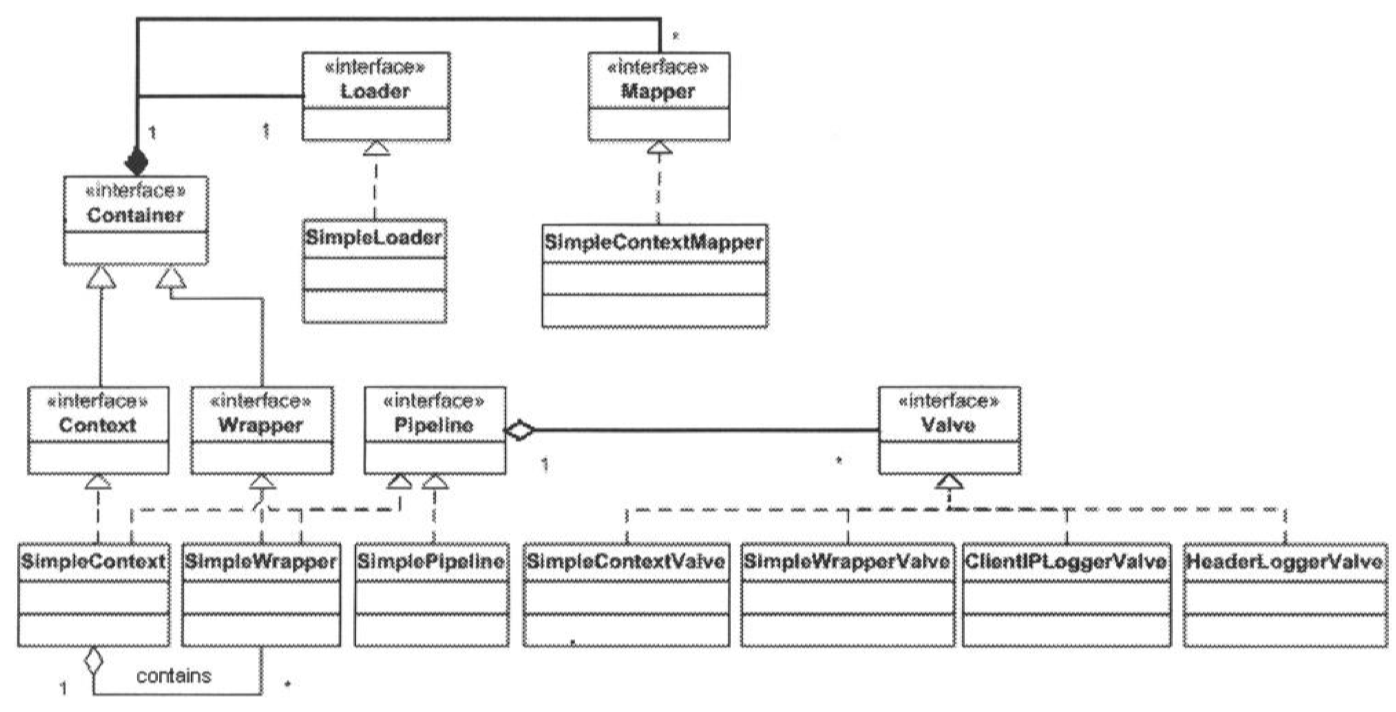
大部分网络应用需要不止一个Servlet,因此我们这里介绍Context。由于有多个Wrapper,因此我们需要一个Mapper对象帮助我们选择一个子Container去处理指定的请求。
Mapper接口的格式如下:
public interface Mapper{
  // 得到与之关联的Container
  public Container getContainer();
  public void setContainer(Container container);
  // 得到该Mapper负责的prorocol
  public String getProtocol();
  public void setProtocol(String protocol);
  public Container map(Request request,boolean update);
}
在Context中维护有一个Map<String,Mapper>的k-v对,通过map方法得到一个Mapper,调用其map方法得到与之关联的Container。
Context要点概括如下:
-
Context包含多个Wrapper
-
Context中有多个Mapper,Mapper与Wraper一一对应,通过选择某个Mapper将请求映射到Wrapper中
-
Loader和Pipeline都与Continer绑定,当Context调用invoke方法时,最后会调用BasicValve的invoke方法,该方法会调用Container的map方法选择调用某一个Wrapper的invokde方法
Wrapper wrapper = null;
try{
  wrapper = (Wrapper)context.map(request,true);
}
// if a wrapper is found,its invoke method is called.
wrapper.invoke(request,response);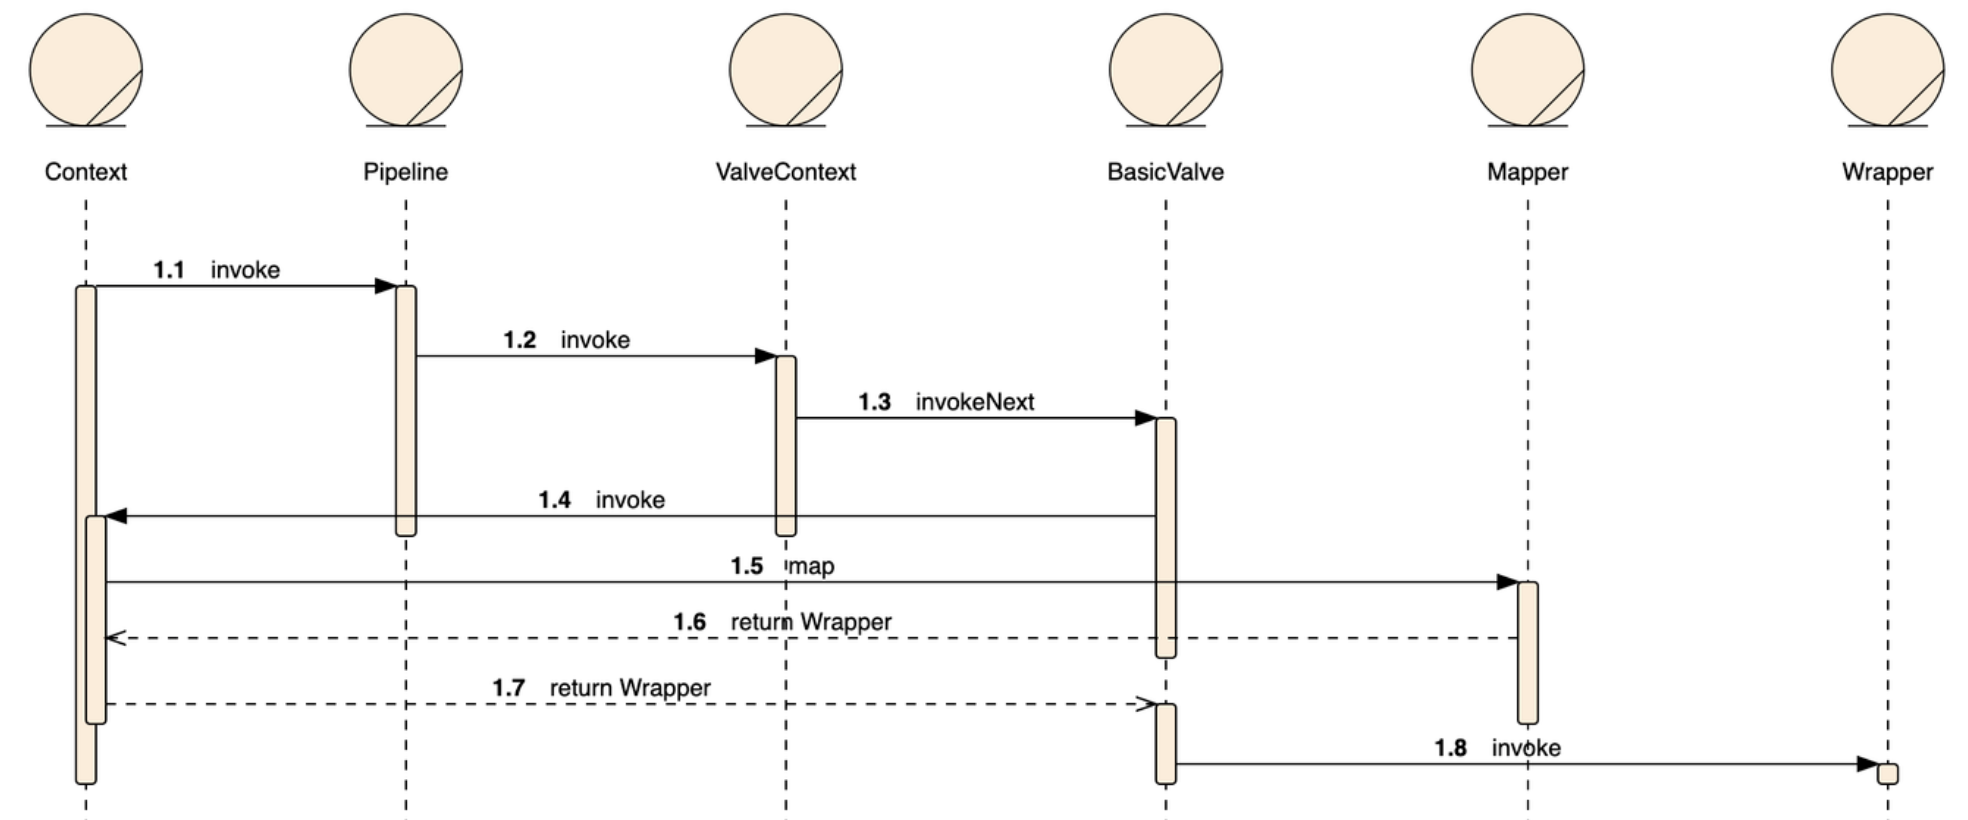
-
Wrapper的invokde方法会调用Context的Loader加载Servlet
4. Lifecycle
在Catalina中,允许一个组件可以包含另外一个组件,例如一个Container类可以包含Loader类或者Manager类。由此可以形成父子结构,父结构有义务负责子结构的生命周期,例如启动或者结束。通过这样的机制,可以实现启动类的一键启动。
与这一机制相关的有两个接口两个类,分别为Lifecycle,LifecycleEvent,LifecycleListener以及LifecycleSupport。
public interface Lifecycle{
  // 定义的事件名称
  public static final String START_EVENT = "start";
  public static final String BEFORE_START_EVENT = "before_start";
  public static final String AFTER_START_EVENT = "after_start";
  public static final String STOP_EVENT = "stop";
  public static final String BEFORE_STOP_EVENT = "before_stop";
  public static final String AFTER_STOP_EVENT = "after_stop";

  public void addLifecycleListener(LifecycleListener listener);
  public LifecycleListener[] findLifecycleListeners();
  public void removeLifecycleListener(LifecycleListener listener);
  public void start() throws LifecycleException;
  public void stop() throws LifecycleException;
}

// 生命周期事件封装类
public class LifecycleEvent{
  private Object data;
  private Lifecycle lifecycle;
  private String type;
}

// 生命周期的监听者
public interface LifecycleListener{
  public void lifecycleEvent(LifecycleEvent event);
}

// Lifecycle实现类的辅助类
// 每一个Lifecycle类需要持有其lifecycle事件的监听者,当有具体的生命周期事件发生时触发监听者,并且也需要管理维护监听者数组
// Catalina把这些动作进行封装,抽象到LifecycleSupport中
public final class LifecycleSupport{
  private Lifecycle lifecycle;
  private LifecycleListener listeners[];

  public void addLifecycleListener(LifecycleListener listener){...}
  public LifecycleListener[] findLifecycleListeners(){...}
  public void fireLifecycleEvent(String type, Object data){...}
}
以SimpleContext为例,解释生命周期、生命周期事件以及生命周期监听者(只列出与之相关的成员变量以及方法)
public class SimpleContext implements Context, Pipeline, Lifecycle{
  protected LifecycleSupport lifecycle = new LifecycleSupport(this);

  public synchronized void start() {
    if (started)
      throw new LifecycleException("SimpleContext has already started");

    // 触发启动前生命周期事件
    lifecycle.fireLifecycleEvent(BEFORE_START_EVENT, null);
    started = true;
    // 调用loader的start
    if ((loader != null) && (loader instanceof Lifecycle))
      ((Lifecycle) loader).start();

    // 调用子container的start
    Container children[] = findChildren();
    for (int i = 0; i < children.length; i++) {
      if (children[i] instanceof Lifecycle)
        ((Lifecycle) children[i]).start();
    }

    // 调用pipeline的start
    if (pipeline instanceof Lifecycle)
      ((Lifecycle) pipeline).start();

    // 触发启动生命周期事件
    lifecycle.fireLifecycleEvent(START_EVENT, null);

    // 触发启动后生命周期事件
    lifecycle.fireLifecycleEvent(AFTER_START_EVENT, null);
  }

  public void stop() throws LifecycleException {
    if (!started)
      throw new LifecycleException("SimpleContext has not been started");
    // 触发停止前生命周期事件
    lifecycle.fireLifecycleEvent(BEFORE_STOP_EVENT, null);
    // 触发停止生命周期事件
    lifecycle.fireLifecycleEvent(STOP_EVENT, null);
    started = false;
    // 调用pipeline的stop
    if (pipeline instanceof Lifecycle) {
      ((Lifecycle) pipeline).stop();
    }

    // 调用子container的stop
    Container children[] = findChildren();
    for (int i = 0; i < children.length; i++) {
      if (children[i] instanceof Lifecycle)
        ((Lifecycle) children[i]).stop();
    }
    // 调用loader的stop
    if ((loader != null) && (loader instanceof Lifecycle)) {
      ((Lifecycle) loader).stop();
    }
    // 触发停止后生命周期事件
    lifecycle.fireLifecycleEvent(AFTER_STOP_EVENT, null);
  }
}
5. Loader
5.1 为什么Tomcat需要自己的类加载器
如果我们使用系统的类加载器去加载servlets以及其他这些servlets所需要的类,那么servlet就能够访问所有的类,包括在JVM的CLASSPATH指明的路径下的所有类和库,这是非常危险的。servlet应该只允许载入WEB-INF/classes目录及其子目录下的类,和部署到WEB-INF/lib下的类。这就是为什么Tomcat也设计自己的类加载器。
5.2 Java类加载机制
JVM使用类加载器把类加载到内存中。Java中有三个类加载器:bootstrap类加载器,extension类加载器以及system类加载器。
- bootstrap类加载器用于加载所有的核心代码,比如java.lang以及java.io包下的类。
- extension类加载器用于加载标准扩展路径下的类,比如/jdk/jre/lib/ext路径下的类。
- application类加载器用于加载CLASSPATH路径下的类,该加载器是由
sun.misc.Launcher$AppClassLoader实现,该类加载器负责加载用户类路径上所指定的类库。开发者可通过ClassLoader.getSystemClassLoader()方法直接获取,故又称为系统类加载器。当应用程序没有自定义类加载器时,默认采用该类加载器。。
这三个层级的类加载器又具有父子关系,通过双亲委派的模式去加载类,即首先委派自己的父类去加载相关类,如果没有加载成功则尝试自己去加载类。
为什么要通过类加载器去加载类,而不是直接new对象出来?因为在代码中可能需要动态的产生新的对象,使用new的方式只能写死产生什么样的对象。
5.3 Loader接口
public interface Loader {

	public ClassLoader getClassLoader();
  public Container getContainer();
  public void setContainer(Container container);
  public DefaultContext getDefaultContext();
  public void setDefaultContext(DefaultContext defaultContext);
  public boolean getDelegate();
  public void setDelegate(boolean delegate);
  public String getInfo();
  public boolean getReloadable();
  public void setReloadable(boolean reloadable);
  public void addPropertyChangeListener(PropertyChangeListener listener);
  public void addRepository(String repository);
  public String[] findRepositories();
  public boolean modified();
  public void removePropertyChangeListener(PropertyChangeListener listener);

}
Tomcat Loader接口指的是一个web应用loader而不是一个class loader。class loader只是web loader的一个组成部分。可以通过getClassLoader来得到Loader所持有的class loader。
Loader通常与一个Context绑定在一起,可以通过setContainer和getContainer来构成这种联系。无论何时container需要一个servlet类的时候,即其invoke方法被调用时,container会首先请求loader的getClassLoader方法得到一个类加载器,然后会调用loadClass方法去加载Servlet类。
当Context中一个或多个类被修改时,Loader可以支持重加载,即不重启Tomcat的情况下重新加载一个类。为了实现这一机制,Loader接口有modified方法,如果它所持有的资源中当有一个或多个类被修改时,会被重新加载。但是它不会自己去重加载,而是通过调用Context接口的reload方法去进行。setReloadable方法和getReloadable方法用于决定Loader是否支持重加载。
以WebappLoader为例,其启动方法中会执行以下操作:
- 创建一个class loader
- 设置仓库
- 设置class path
- 设置权限许可
- 为自动重加载开启一个线程
如果Loader支持自动重加载,会开启一个线程,每间隔一段时间就去检查一下其持有的资源是否修改了,如果修改了就通知context去重加载:
 public void run() {

   // Loop until the termination semaphore is set
   while (!threadDone) {
     // Wait for our check interval
     threadSleep();
     if (!started)
       break;
     try {
       // Perform our modification check
       if (!classLoader.modified())
         continue;
     } catch (Exception e) {
       log(sm.getString("webappLoader.failModifiedCheck"), e);
       continue;
     }
     // Handle a need for reloading
     notifyContext();
     break;

   }

 }
5.5 ClassLoader
在WebappClassLoader中有一个triggers和packageTriggers用于禁止加载某类以及某目录下得了类。
private static final String[] triggers = {
  "javax.servlet.Servlet"                     // Servlet API
};

private static final String[] packageTriggers = {
  "javax",                                     // Java extensions
  "org.xml.sax",                               // SAX 1 & 2
  "org.w3c.dom",                               // DOM 1 & 2
  "org.apache.xerces",                         // Xerces 1 & 2
  "org.apache.xalan"                           // Xalan
};
为了更好的性能,会将加载过的类以及没有找到加载的类分别放到两个Map中。加载过的类会用ResourceEntry进行封装。
public class ResourceEntry {

	public long lastModifled = -1;
  // Binary content of the resource.
	public byte[] binaryContent = null;
  public Class loadedClass = null;
  // URL source from where the object was loaded.
  public URL source = null;
  // URL of the codebase from where the object was loaded.
  public URL CodeBase = null;
  public Manifest manifest = null;
  public Certificate[] certificates = null;

}
WebappClassLoader类加载过程分为以下几步:
- 首先检查类中的cache,检查是否被缓存
- 如果没有则检查ClassLoader的缓存
- 如果也没有找到,则拿到application类加载器,防止web应用覆盖jdk中的基础类
- 如果开启了SecurityManager,则检查路径是否合法
- 如果delegate标志位为true,即开启了双亲委派模型,或者所寻找的类包路径在禁止加载路径中,则执行双亲委派模型(这里一般是false,所以tomcat也就违反了双亲委派模型)
- 在当前的repositories中寻找类,repositories是在Context初始化的时候被设置的,因此WebappClassLoader其实实现了Context级别的类隔离
- 如果delegate为false(即第6步没有执行),则通过双亲委派模型去执行
- 如果类还没找到,则报错
public Class loadClass(String name, boolean resolve)
  throws ClassNotFoundException {
  Class clazz = null;

  // Don't load classes if class loader is stopped
  if (!started) {
    log("Lifecycle error : CL stopped");
    throw new ClassNotFoundException(name);
  }
  // (0) Check our previously loaded local class cache
  clazz = findLoadedClass0(name);
  if (clazz != null) {
    if (resolve)
      resolveClass(clazz);
    return (clazz);
  }
  // (0.1) Check our previously loaded class cache
  clazz = findLoadedClass(name);
  if (clazz != null) {
    if (resolve)
      resolveClass(clazz);
    return (clazz);
  }

  // (0.2) Try loading the class with the system class loader, to prevent
  //       the webapp from overriding J2SE classes
	//通过系统的来加载器加载此类,这里防止应用写的类覆盖了J2SE的类,这句代码非常关键,如果不写的话
	//就会造成你自己写的类有可能会把J2SE的类给替换调,另外假如你写了一个javax.servlet.Servlet类,放在当前应用的WEB-INF/class中
	//如果没有此句代码的保证,那么你自己写的类就会替换到Tomcat容器Lib中包含的类
  try {
    clazz = system.loadClass(name);
    if (clazz != null) {
      if (resolve)
        resolveClass(clazz);
      return (clazz);
    }
  } catch (ClassNotFoundException e) {
    // Ignore
  }

  // (0.5) Permission to access this class when using a SecurityManager
  if (securityManager != null) {
    int i = name.lastIndexOf('.');
    if (i >= 0) {
      try {
        securityManager.checkPackageAccess(name.substring(0,i));
      } catch (SecurityException se) {
        String error = "Security Violation, attempt to use " +
          "Restricted Class: " + name;
        System.out.println(error);
        se.printStackTrace();
        log(error);
        throw new ClassNotFoundException(error);
      }
    }
  }

  boolean delegateLoad = delegate || filter(name);

  // (1) Delegate to our parent if requested
  if (delegateLoad) {
    if (debug >= 3)
      log("  Delegating to parent classloader");
    ClassLoader loader = parent;
    if (loader == null)
      loader = system;
    try {
      clazz = loader.loadClass(name);
      if (clazz != null) {
        if (debug >= 3)
          log("  Loading class from parent");
        if (resolve)
          resolveClass(clazz);
        return (clazz);
      }
    } catch (ClassNotFoundException e) {
      ;
    }
  }

  // (2) Search local repositories
	//调用findClass方法在webapp级别进行加载
  if (debug >= 3)
    log("  Searching local repositories");
  try {
    clazz = findClass(name);
    if (clazz != null) {
      if (debug >= 3)
        log("  Loading class from local repository");
      if (resolve)
        resolveClass(clazz);
      return (clazz);
    }
  } catch (ClassNotFoundException e) {
    ;
  }

  // (3) Delegate to parent unconditionally
  //如果还是没有加载到类,并且不采用委托机制的话,则通过父类加载器去加载。
  if (!delegateLoad) {
    if (debug >= 3)
      log("  Delegating to parent classloader");
    ClassLoader loader = parent;
    if (loader == null)
      loader = system;
    try {
      clazz = loader.loadClass(name);
      if (clazz != null) {
        if (debug >= 3)
          log("  Loading class from parent");
        if (resolve)
          resolveClass(clazz);
        return (clazz);
      }
    } catch (ClassNotFoundException e) {
      ;
    }
  }

  // This class was not found
  throw new ClassNotFoundException(name);

}
6. 会话管理(Session Management)
Catalina通过Manager对象来管理Session,Manager对象总是与一个Context相关联。
Servlet对象通过请求HttpServletRequest接口的getSession方法得到Session对象,如下所示
public HttpSession getSession(){
  return (getSession(true));
}

public HttpSession getSession(boolean create){
  ...
  return doGetSession(create);
}

private HttpSession doGetSession(boolean create) {
  // There cannot be a session if no context has been assigned yet
  if (context == null)
    return (null);

  // Return the current session if it exists and is valid
  if ((session != null) && !session.isValid())
    session = null;
  if (session != null)
    return (session.getSession());


  // Return the requested session if it exists and is valid
  Manager manager = null;
  if (context != null)
    manager = context.getManager();

  if (manager == null)
    return (null);      // Sessions are not supported

  if (requestedSessionId != null) {
    try {
      session = manager.findSession(requestedSessionId);
    } catch (IOException e) {
      session = null;
    }
    if ((session != null) && !session.isValid())
      session = null;
    if (session != null) {
      return (session.getSession());
    }
  }

  // Create a new session if requested and the response is not committed
  if (!create)
    return (null);
  if ((context != null) && (response != null) &&
      context.getCookies() &&
      response.getResponse().isCommitted()) {
    throw new IllegalStateException
      (sm.getString("httpRequestBase.createCommitted"));
  }

  session = manager.createSession();
  if (session != null)
    return (session.getSession());
  else
    return (null);

}
可见每一个request都持有一个session成员变量。如果session为空时,会通过其持有的Context对象拿到Manager,然后通过Manager生产得到Session对象。
6.1 Sessions
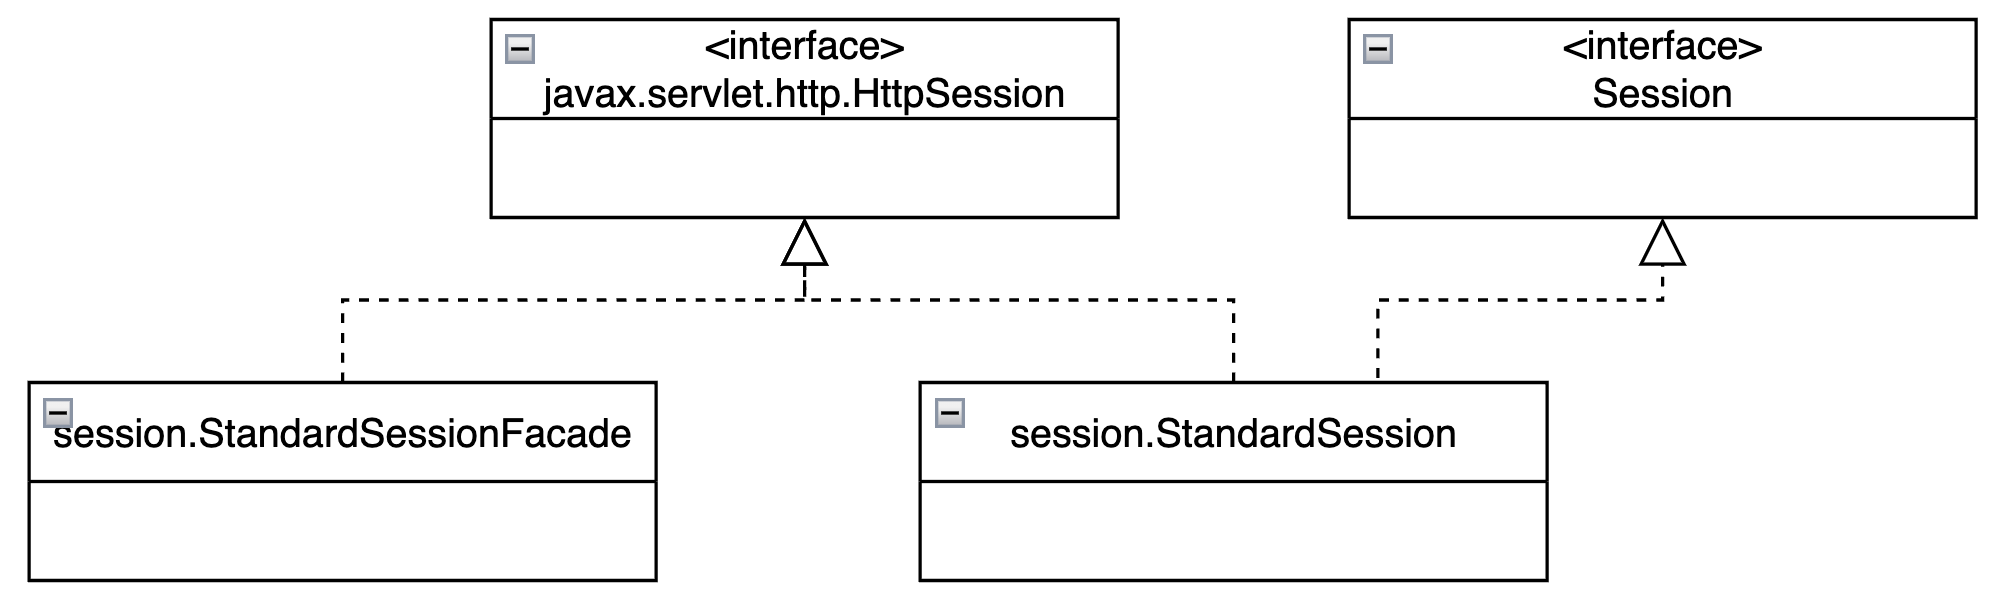
- Session对象一定是被包含在一个Manager中
- 出于安全考虑,Manager返回的Session对象是StandardSessionFacade(通过门面模式,防止Request对象通过Manager得到Session后向下转型,使用StandardSession的公有方法)
- Session接口中有个expire方法,用于被Manager对象调用,标明该Session已过期
6.2 Manager
在Manager对象中,通过一个map来管理Session对象,key时Session对象唯一的id,value是Session对象本身。
6.2.1 StandardManager
StandardManager实现了Lifecycle接口,当执行stop方法的时候会调用unload方法序列化所有的有效Session到SESSIONS.ser文件中。
StandardManager同时实现了Runnable方法,它会启动一个线程定时清理过期Session
public void run() { // Loop until the termination semaphore is set
  while (!threadDone) {
    threadSleep();
    processExpires();
  }
}
在processExpires方法中,StandardManager会遍历每一个Session对象,比较lastAccessedTime与当前时间是否超过maxInactiveInterval,然后调用Session的expire方法去过期Session实例。
6.2.2 PersistentManagerBase
与StandardManager不同的是,PersistentManagerBase持有一个Store对象,可以将管理的Session保存到第二个位置,即Store对象所表示的地方。
在PersistentManagerBase也实现了Runnable接口,可以使用一个独立的线程周期性的扫出或者交换活跃Session。
public void run() {
  // Loop until the termination semaphore is set
  while (!threadDone) {
  	threadSleep();
    processExpires();
    processPersistenceChecks();
  }
}
与StandardManager相比,PersistentManagerBase的独立线程多了一个processPersistenceChecks()方法。在该方法中会调用三个其他方法
public void processPersistenceChecks(){
  processMaxIdleSwaps();
  processMaxActiveSwaps();
  processMaxIdleBackups();
}
Session被换出(swap out)或者因为活跃的session数已经超过了maxActiveSessions的数目(processMaxActiveSwaps),或者因为session已经闲置了太久(processMaxIdleSwaps)。
因为存在swap-out的机制,session可能存在与内存中或者store中,因此findSession函数会先在自己的内存map中寻找session,如果没有,则到store中寻找。
public Session findSession(String id) throws IOException {

Session session = super.findSession(id);
  if (session != null)
    return (session);
  // not found in memory, see if the Session is in the
  Store session = swapIn(id); // swapIn returns an active session in the
  return (session);
}
6.2.3 DistributedManager
DistributedManager用于集群环境中,在创建或者删除一个Session对象的时候都会通过HTTP请求通知集群中的其他节点。
借助ClusterSender去给其他节点发送通知,使用ClusterReceiver来接收其他节点的通知。
6.3 Store
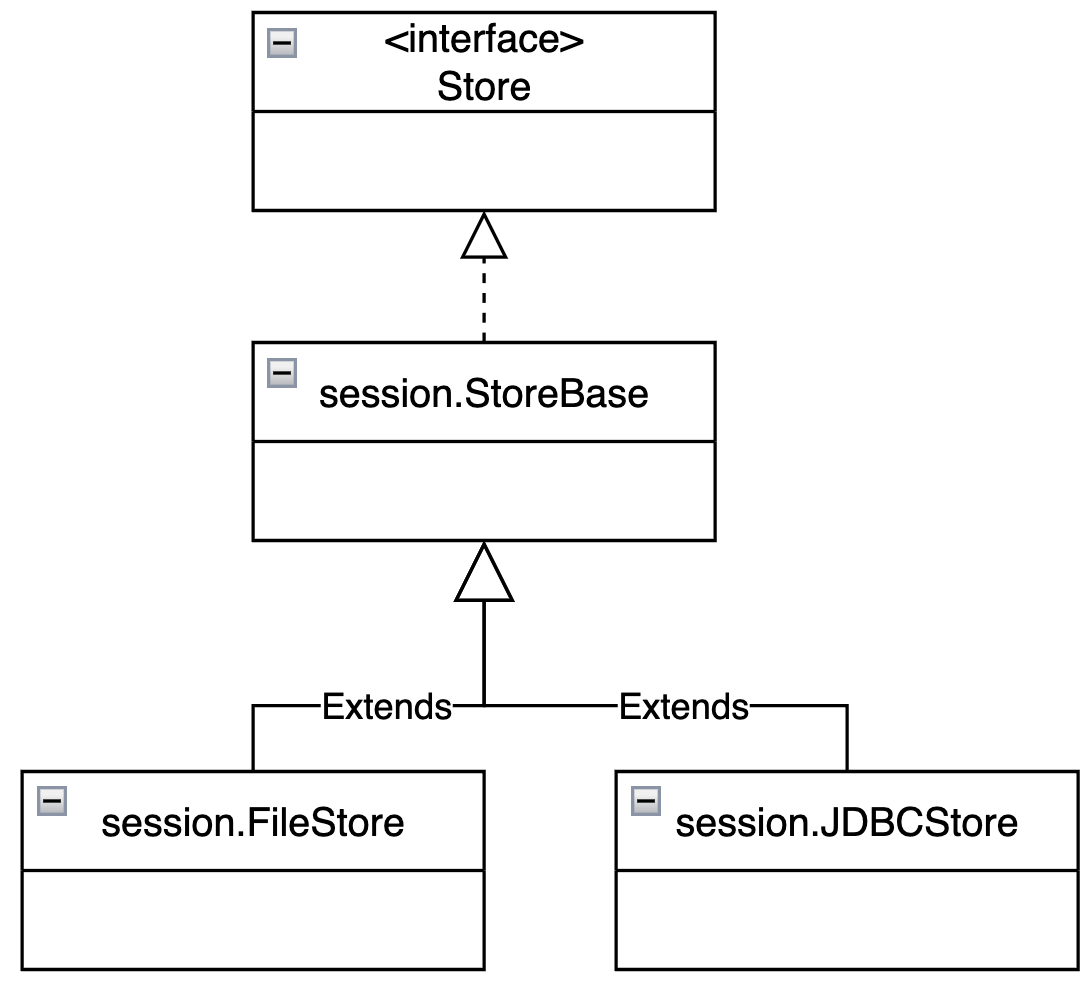
根据存储的目的地分类两类,一类是FileStore,一类是JDBCStore。
7. StandardWrapper
对于每一个调来的HTTP请求,Tomcat处理流程如下:
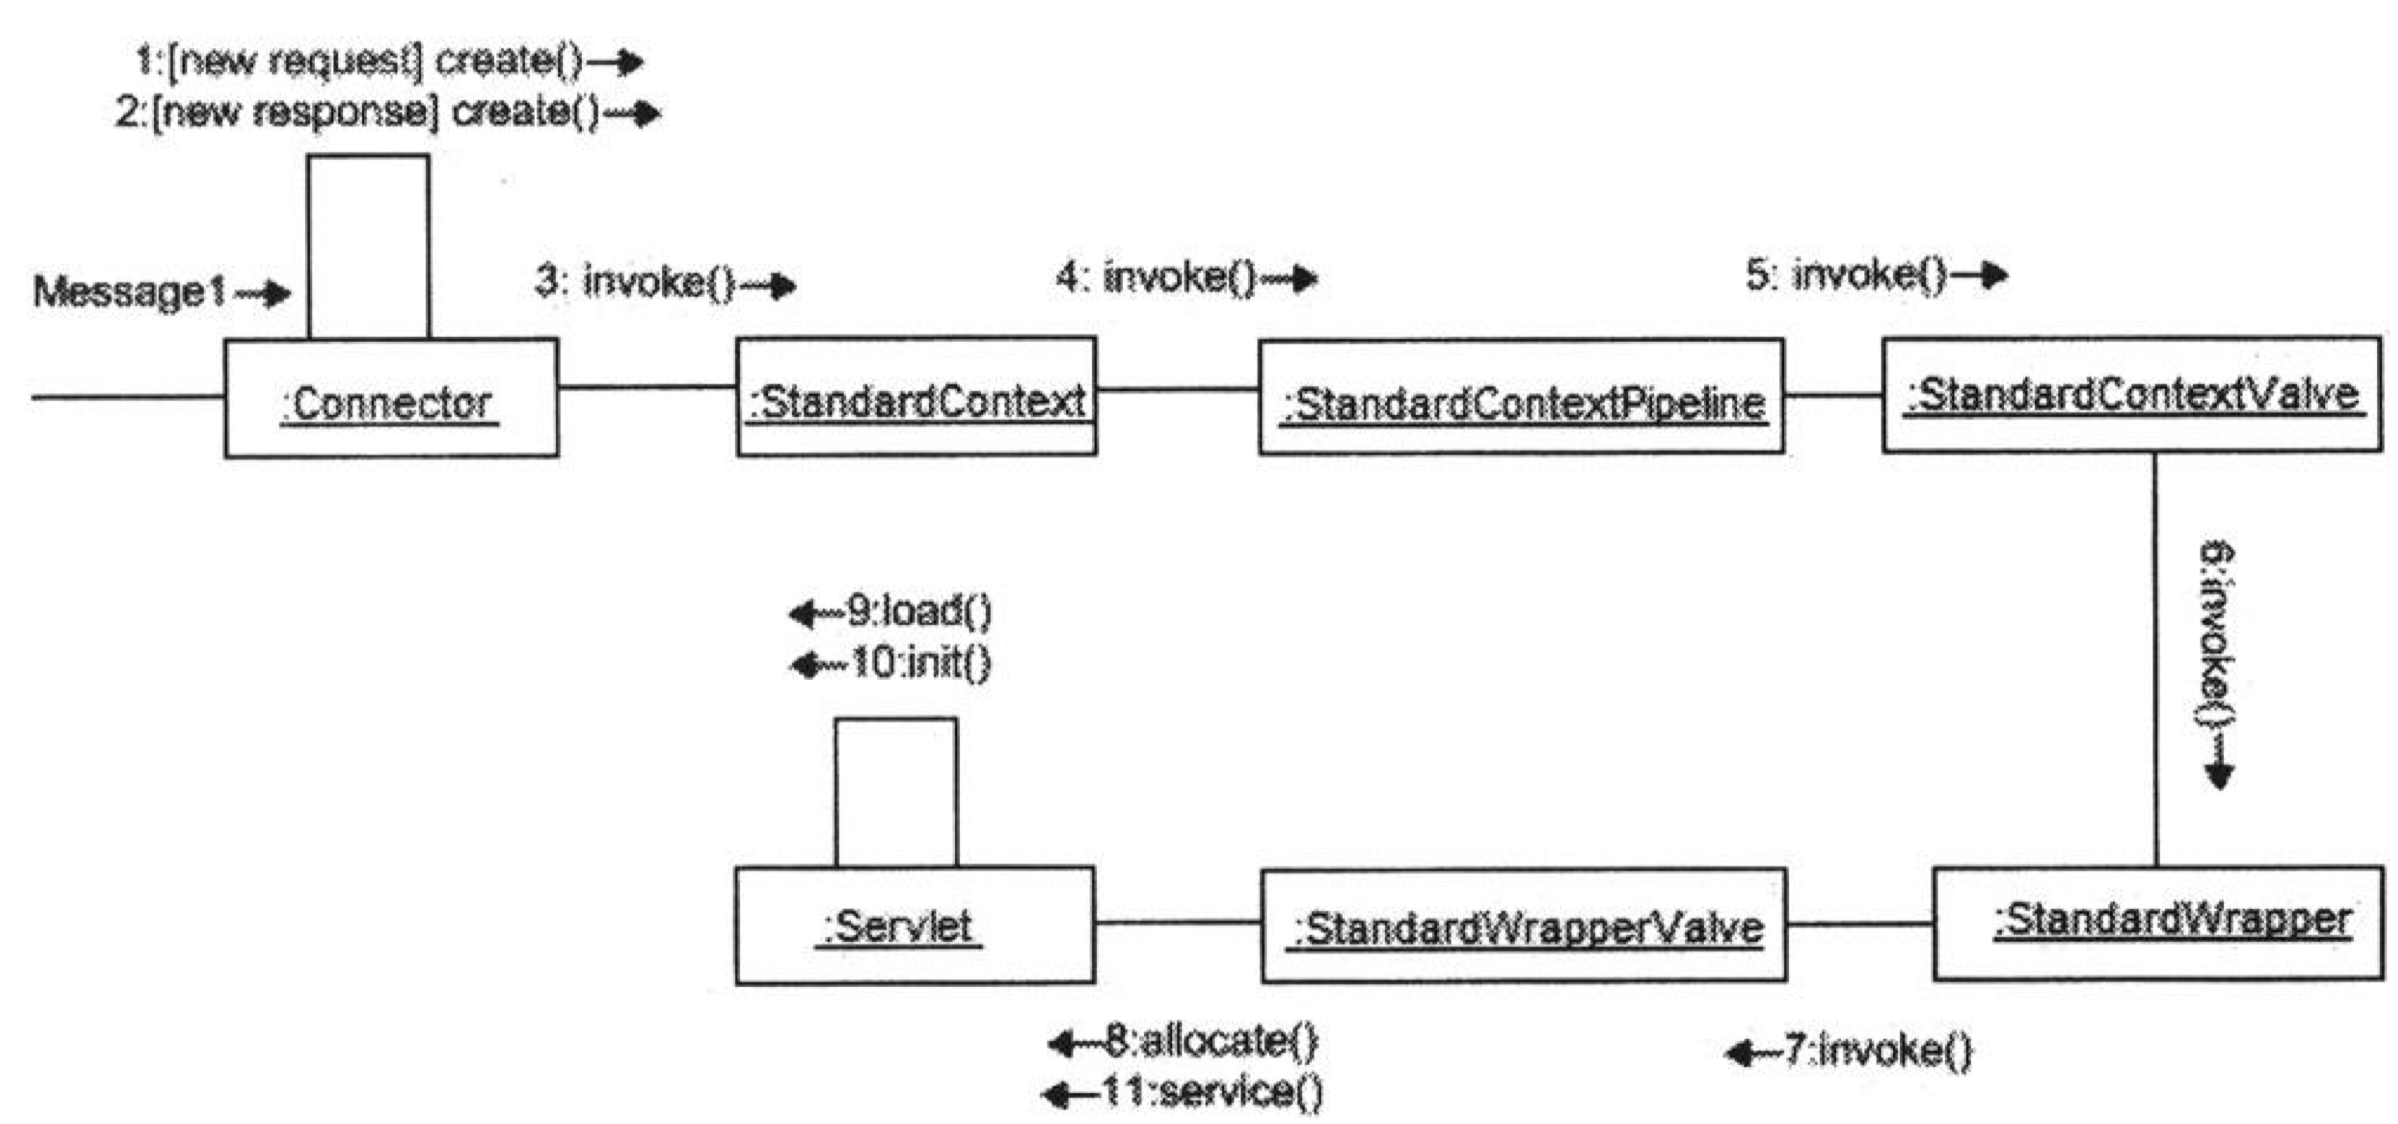
- connector首先委托processor,通过传入的socket生成request和response对象
- connector请求StandardContext对象的invoke方法
- StandardContext的invoke方法其Pipeline的invoke方法,最终会调用该Pipeline的Basic方法——StandardContextValve
- StandardContextValve的invoke方法会调用Context对象的map方法得到合适的wrapper来处理request并且调用wrapper的invoke方法
- StandardWrapper是wrapper的标准实现。StandardWrapper实例调用它自己的pipeline的invoke方法
- StandardWrapperValve是StandardWrapper的流水线的basic valve。因此,StandardWrapperValve的invoke方法被调用。StandardWrapperValve调用wrapper的allocate方法去获得servlet的实例
- 如果servlet需要被加载,allocate方法请求load方法去加载servlet
- StandardWrapperValve调用servlet的service方法
7.1 SingleThreadModel
SingleThreadModel是一个接口,实现了该接口Servlet必须保证同一时间只能处理一个request。但是注意,该接口并不能阻止多个Servlet实例同时访问静态字段导致的同步问题。
为了提高效率,通常对Servlet对象进行池化处理,对于不同的请求分配不同的Servlet对象。
7.2 StandardWrapper的allocate和loadServlet方法
StandardWrapper的主要职责是加载与其关联的servlet并分配一个实例,但是它并不调用servlet的service方法。该工作由StandardWrapperValve对象去完成。
StandardWrapperValve对象会调用StandardWrapper的allocate方法,在该方法中,如果servlet被第一次调用则会首先加载该servlet。
 public Servlet allocate() throws ServletException {

   // If we are currently unloading this servlet, throw an exception
   if (unloading)
     throw new ServletException
     (sm.getString("standardWrapper.unloading", getName()));

   // If not SingleThreadedModel, return the same instance every time
   // singleThreadModel是一个成员变量用于标示与之关联的servlet是否是STM,其初始值为false,但是loadServlet方法在加载Servlet时会根据Servlet是否实现了SingleThreadModel接口而改变这个成员属性
   if (!singleThreadModel) {
     // Load and initialize our instance if necessary
     if (instance == null) {
       synchronized (this) {
         if (instance == null) {
           try {
             instance = loadServlet();
           } catch (ServletException e) {
             throw e;
           } catch (Throwable e) {
             throw new ServletException
               (sm.getString("standardWrapper.allocate"), e);
           }
         }
       }
     }
     // 因为在执行完loadServlet后singleThreadModel可能会改变,因此需要重新判断
     if (!singleThreadModel) {
       if (debug >= 2)
         log("  Returning non-STM instance");
       // countAllocated是一个成员变量,用于记录当前正活跃的allocate请求
       countAllocated++;
       return (instance);
     }

   }

   // nInstances:当前Servlet对象数
   // maxInstances:Servlet最大数
   // instancePool:使用Stack来维护一组Servlet对象
   synchronized (instancePool) {
     while (countAllocated >= nInstances) {
       // Allocate a new instance if possible, or else wait
       if (nInstances < maxInstances) {
         try {
           instancePool.push(loadServlet());
           nInstances++;
         } catch (ServletException e) {
           throw e;
         } catch (Throwable e) {
           throw new ServletException
             (sm.getString("standardWrapper.allocate"), e);
         }
       } else {
         try {
           instancePool.wait();
         } catch (InterruptedException e) {
           ;
         }
       }
     }
     if (debug >= 2)
       log("  Returning allocated STM instance");
     countAllocated++;
     return (Servlet) instancePool.pop();

   }

 }
public synchronized Servlet loadServlet() throws ServletException {

  // Nothing to do if we already have an instance or an instance pool
  if (!singleThreadModel && (instance != null))
    return instance;

  PrintStream out = System.out;
  SystemLogHandler.startCapture();
  Servlet servlet = null;
  // 首先解析Servlet的名字
  try {
    // If this "servlet" is really a JSP file, get the right class.
    // HOLD YOUR NOSE - this is a kludge that avoids having to do special
    // case Catalina-specific code in Jasper - it also requires that the
    // servlet path be replaced by the <jsp-file> element content in
    // order to be completely effective
    // JSP也是一种Servlet
    String actualClass = servletClass;
    if ((actualClass == null) && (jspFile != null)) {
      Wrapper jspWrapper = (Wrapper)
        ((Context) getParent()).findChild(Constants.JSP_SERVLET_NAME);
      if (jspWrapper != null)
        actualClass = jspWrapper.getServletClass();
    }

    // Complain if no servlet class has been specified
    if (actualClass == null) {
      unavailable(null);
      throw new ServletException
        (sm.getString("standardWrapper.notClass", getName()));
    }

    // Acquire an instance of the class loader to be used
    Loader loader = getLoader();
    if (loader == null) {
      unavailable(null);
      throw new ServletException
        (sm.getString("standardWrapper.missingLoader", getName()));
    }

    ClassLoader classLoader = loader.getClassLoader();

    // Special case class loader for a container provided servlet
    if (isContainerProvidedServlet(actualClass)) {
      classLoader = this.getClass().getClassLoader();
      log(sm.getString
          ("standardWrapper.containerServlet", getName()));
    }

    // Load the specified servlet class from the appropriate class loader
    // 加载对象
    Class classClass = null;
    try {
      if (classLoader != null) {
        System.out.println("Using classLoader.loadClass");
        classClass = classLoader.loadClass(actualClass);
      } else {
        System.out.println("Using forName");
        classClass = Class.forName(actualClass);
      }
    } catch (ClassNotFoundException e) {
      unavailable(null);
      throw new ServletException
        (sm.getString("standardWrapper.missingClass", actualClass),
         e);
    }
    if (classClass == null) {
      unavailable(null);
      throw new ServletException
        (sm.getString("standardWrapper.missingClass", actualClass));
    }

    // Instantiate and initialize an instance of the servlet class itself
    // 初始化对象
    try {
      servlet = (Servlet) classClass.newInstance();
    } catch (ClassCastException e) {
      unavailable(null);
      // Restore the context ClassLoader
      throw new ServletException
        (sm.getString("standardWrapper.notServlet", actualClass), e);
    } catch (Throwable e) {
      unavailable(null);
      // Restore the context ClassLoader
      throw new ServletException
        (sm.getString("standardWrapper.instantiate", actualClass), e);
    }

    // Check if loading the servlet in this web application should be allowed
    if (!isServletAllowed(servlet)) {
      throw new SecurityException
        (sm.getString("standardWrapper.privilegedServlet",
                      actualClass));
    }

    // Special handling for ContainerServlet instances
    if ((servlet instanceof ContainerServlet) &&
        isContainerProvidedServlet(actualClass)) {
      System.out.println("calling setWrapper");
      ((ContainerServlet) servlet).setWrapper(this);
      System.out.println("after calling setWrapper");
    }


    // Call the initialization method of this servlet
    try {
      instanceSupport.fireInstanceEvent(InstanceEvent.BEFORE_INIT_EVENT,servlet);
      // 传入一个ServletConfig对象,facade实际上就是StandardWrapper的封装对象
      servlet.init(facade);
      // Invoke jspInit on JSP pages
      if ((loadOnStartup > 0) && (jspFile != null)) {
        // Invoking jspInit
        HttpRequestBase req = new HttpRequestBase();
        HttpResponseBase res = new HttpResponseBase();
        req.setServletPath(jspFile);
        req.setQueryString("jsp_precompile=true");
        servlet.service(req, res);
      }
      instanceSupport.fireInstanceEvent(InstanceEvent.AFTER_INIT_EVENT,
                                        servlet);
    } catch (UnavailableException f) {
      instanceSupport.fireInstanceEvent(InstanceEvent.AFTER_INIT_EVENT,
                                        servlet, f);
      unavailable(f);
      throw f;
    } catch (ServletException f) {
      instanceSupport.fireInstanceEvent(InstanceEvent.AFTER_INIT_EVENT,
                                        servlet, f);
      // If the servlet wanted to be unavailable it would have
      // said so, so do not call unavailable(null).
      throw f;
    } catch (Throwable f) {
      instanceSupport.fireInstanceEvent(InstanceEvent.AFTER_INIT_EVENT,
                                        servlet, f);
      // If the servlet wanted to be unavailable it would have
      // said so, so do not call unavailable(null).
      throw new ServletException
        (sm.getString("standardWrapper.initException", getName()), f);
    }

    // Register our newly initialized instance
    // 判断servlet是否实现了SingleThreadModel接口,改变Wrapper的SingleThreadModel
    singleThreadModel = servlet instanceof SingleThreadModel;
    if (singleThreadModel) {
      if (instancePool == null)
        instancePool = new Stack();
    }
    fireContainerEvent("load", this);
  } finally {
    String log = SystemLogHandler.stopCapture();
    if (log != null && log.length() > 0) {
      if (getServletContext() != null) {
        getServletContext().log(log);
      } else {
        out.println(log);
      }
    }
  }
  return servlet;

}
7.3 StandardWrapperVavle
StandardWrapperValve执行的操作:
- 通过调用StandardWrapper的allocate方法得到StandardWrapper相关联的servlet
- 通过调用createFilterChain私有方法创建与servlet相关联的filter chain
- 调用filter chain的doFilter方法,这包括调用servlet的service方法
- 释放filter chain
- 调用wrapper的deallocate方法
- 如果servlet永久性不可用,调用wrapper的unload方法
public void invoke(Request request,Response response,ValveContext valveContext){
  ...
  // Allocate a servlet instance to process this request
  if (!unavailable) {
    servlet = wrapper.allocate();
  }
  ...
  // Acknowlege the request
  response.sendAcknowledgement();
  ...
  // Create the filter chain for this request
  ApplicationFilterChain filterChain = createFilterChain(request, servlet);
  ...
  // Call the filter chain for this request
  // NOTE: This also calls the servlet's service() method
  filterChain.doFilter(sreq, sres);
  ...
  // Deallocate the allocated servlet instance
  if (servlet != null) {
    wrapper.deallocate(servlet);
  }
  ...
  // If this servlet has been marked permanently unavailable,
  // unload it and release this instance
  if ((servlet != null) &&
      (wrapper.getAvailable() == Long.MAX_VALUE)) {
    wrapper.unload();
  }
  ...
}
以上代码的核心是ApplicationFilterChain filterChain = createFilterChain(request,servlet)方法。
    private ApplicationFilterChain createFilterChain(Request request,
                                                     Servlet servlet) {

        // If there is no servlet to execute, return null
        if (servlet == null)
            return (null);

        // Create and initialize a filter chain object
        ApplicationFilterChain filterChain =
          new ApplicationFilterChain();
        filterChain.setServlet(servlet);
        StandardWrapper wrapper = (StandardWrapper) getContainer();
        filterChain.setSupport(wrapper.getInstanceSupport());

        // Acquire the filter mappings for this Context
        StandardContext context = (StandardContext) wrapper.getParent();
        // filterMaps和filterConfigs都是在Context中维护的
        FilterMap filterMaps[] = context.findFilterMaps();

        // If there are no filter mappings, we are done
        if ((filterMaps == null) || (filterMaps.length == 0))
            return (filterChain);

        // Acquire the information we will need to match filter mappings
        String requestPath = null;
        if (request instanceof HttpRequest) {
            HttpServletRequest hreq =
                (HttpServletRequest) request.getRequest();
            String contextPath = hreq.getContextPath();
            if (contextPath == null)
                contextPath = "";
            String requestURI = ((HttpRequest) request).getDecodedRequestURI();
            if (requestURI.length() >= contextPath.length())
                requestPath = requestURI.substring(contextPath.length());
        }
        String servletName = wrapper.getName();
        int n = 0;

        // Add the relevant path-mapped filters to this filter chain
      	// 选出符合当前请求path的filterMap,filterMap与filterName一一对应
        // 然后再通过filterName找到ApplicationFilterConfig,添加到filterChain中
        for (int i = 0; i < filterMaps.length; i++) {
            if (!matchFiltersURL(filterMaps[i], requestPath))
                continue;
            ApplicationFilterConfig filterConfig = (ApplicationFilterConfig)
                context.findFilterConfig(filterMaps[i].getFilterName());
            if (filterConfig == null) {
                continue;
            }
            filterChain.addFilter(filterConfig);
            n++;
        }

        // Add filters that match on servlet name second
        // 通过servletName进行筛选过滤器,添加到filterChain中
        for (int i = 0; i < filterMaps.length; i++) {
            if (!matchFiltersServlet(filterMaps[i], servletName))
                continue;
            ApplicationFilterConfig filterConfig = (ApplicationFilterConfig)
                context.findFilterConfig(filterMaps[i].getFilterName());
            if (filterConfig == null) {
                continue;
            }
            filterChain.addFilter(filterConfig);
            n++;
        }

        return (filterChain);

    }
8. StandardContext
8.1 StandardContext启动过程
在StandardContext的start方法中:
- 触发BEFORE_START事件
- 设置
availability属性为false - 设置
configured属性为false - 设置
resources - 设置
loader - 设置会话管理
manager - 初始化一个character set mapper
- 启动与Context相关联的其他组件
- 启动其子容器
- 启动pipeline
- 触发START事件(会触发LifecycleListener——ContextConfig,该监听器会解析web.xml完成Context的配置,并设置
configured字段为true) - 检查
configured属性,如果为true则调用postWelcomePages方法,加载需要加载的子wrappers,并且设置availablity为true - 触发AFTER_START事件
8.2 StandardContext的invoke方法
StandardContext的invoke方法被与之关联的connector调用,或者如果Context有父Host,则被host的invoke方法而调用。
StandardContext的invoke方法会首先检查Context是否在reloading,然后会调用其父类,ContainerBase的invoke方法,该方法会调用pipeline的invoke方法。
StandardContextValve是Context的pipeline的basic valve,也就是最终被调用的valve。
在StandardContextValve中,会先在Context中根据请求的协议找到一个Mapper对象,然后调用Mapper对象的map方法得到Wrapper。其中Mapper对象是父Container用于寻找子Container的映射类。
在StandardContext启动时,已经添加了一个Mapper类,即默认的StandardContextMapper。
8.3 StandardContextMapper
StandardContextMapper中的核心方法是map,在该方法中会有四个匹配规则
- Rule 1 – Exact Match
- Rule 2 – Prefix Match
- Rule 3 – Extension Match
- Rule 4 – Default Match
优先级自上至下,通过relativeURI在Context的servletMapping成员属性中寻找与之对应的wrapperName,然后到children成员属性中根据wrapperName得到与之对应的wrapper。其中servletMapping是一个key为pattern,value为wrapperName的HashMap,children是key为name,value为Container的HashMap。
servletMapping是在Bootstrap对象中手动添加的,如下
context.addServletMapping("/Primitive", "Primitive"); context.addServletMapping("/Modern", "Modern");
8.4 backgroundProcess方法
在Context中,其他组件比如loader和manager可能都需要单独的后台线程去处理自己的逻辑,比如loader需要支持自动重载或者manager清理过期session等。
在Tomcat4中,这些组件都拥有自己的线程。但是在Tomcat5中,为了节省资源,所有的这些后台逻辑都共享同一个线程。在ContainerBase的start方法中,会调用threadStart方法,该方法会启动一个线程执行内部类ContainerBackgroundProcessor的run方法。
protected class ContainerBackgroundProcessor implements Runnable {

        @Override
        public void run() {
            processChildren(ContainerBase.this);
        }

        protected void processChildren(Container container) {
            ClassLoader originalClassLoader = null;

            try {
                if (container instanceof Context) {
                    Loader loader = ((Context) container).getLoader();
                    // Loader will be null for FailedContext instances
                    if (loader == null) {
                        return;
                    }

                    // Ensure background processing for Contexts and Wrappers
                    // is performed under the web app's class loader
                    originalClassLoader = ((Context) container).bind(false, null);
                }
                container.backgroundProcess();
                Container[] children = container.findChildren();
                for (Container child : children) {
                    if (child.getBackgroundProcessorDelay() <= 0) {
                        processChildren(child);
                    }
                }
            } catch (Throwable t) {
                ExceptionUtils.handleThrowable(t);
                log.error(sm.getString("containerBase.backgroundProcess.error"), t);
            } finally {
                if (container instanceof Context) {
                    ((Context) container).unbind(false, originalClassLoader);
                }
            }
        }
    }
在该方法中会调用当前container的backgroundProcess方法以及子container的backgroundProcess方法。
在container的backgroundProcess方法中,又会调用其组件(比如Manager或Loader)的一些后台逻辑。
9. Server和Service
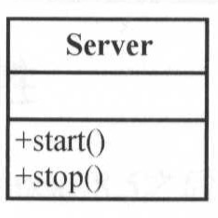
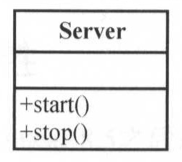
从最基本的功能来讲,服务器接收其他计算机发来的请求数据并进行解析,完成相关的业务处理,然后把处理结果作为响应返回给计算机。
一个最简单的服务器设计如下图所示:
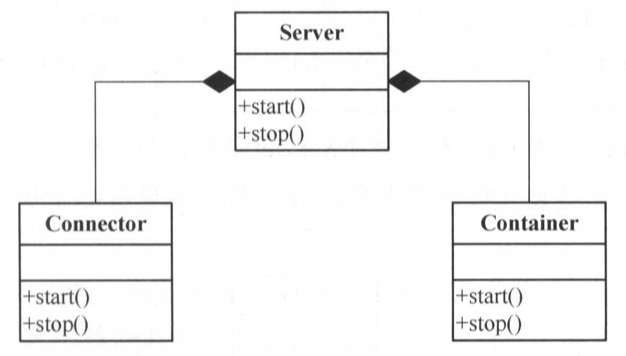
我们把请求的监听和请求处理逻辑放在一起扩展性很差,因为我们可能需要适配多种网络协议,但请求的处理逻辑却相同。因此我们可以将网络协议与请求处理从概念上分离,如下图所示:
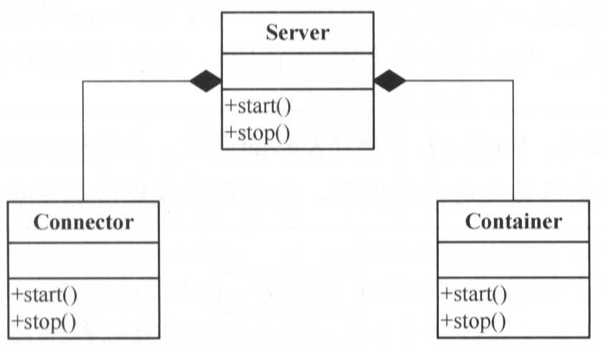
一个Server可以包含多个Connector和Container,Connector负责开启Socket并监听客户端请求、返回响应数据;Container负责具体的请求处理。但这样设计仍然存在问题,即需要一套复杂的规则来维护Connector到Container的映射关系。
为此,我们使用Service对象来维护这一映射关系
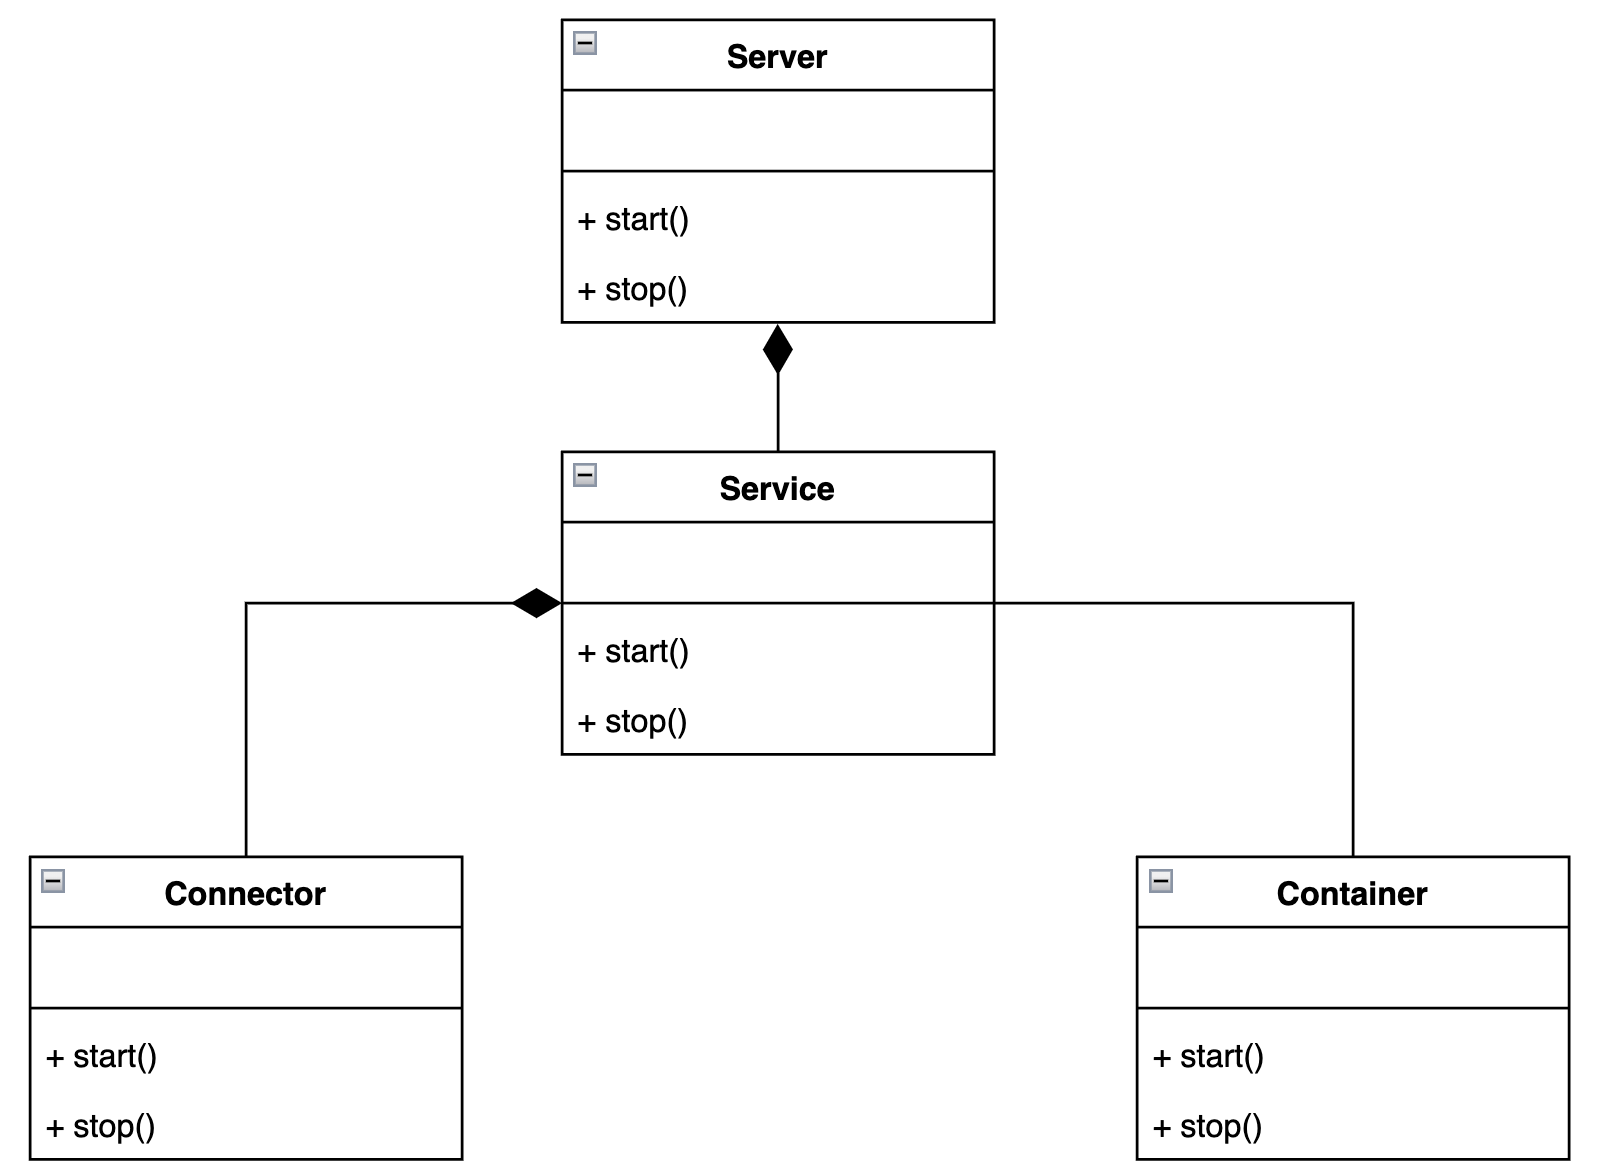
Server可以拥有多个Service,在Service中可以有多个Connector但是只能有一个Container。
10. XML解析
在Tomcat的启动类Bootstrap中,会配置组件以及组件的各种属性,如下所示
public final class Bootstrap {
  public static void main(String[] args) {

    System.setProperty("catalina.base", System.getProperty("user.dir"));
    Connector connector = new HttpConnector();

    Wrapper wrapper1 = new StandardWrapper();
    wrapper1.setName("Primitive");
    wrapper1.setServletClass("PrimitiveServlet");
    Wrapper wrapper2 = new StandardWrapper();
    wrapper2.setName("Modern");
    wrapper2.setServletClass("ModernServlet");

    Context context = new StandardContext();
    // StandardContext's start method adds a default mapper
    context.setPath("/app1");
    context.setDocBase("app1");

    context.addChild(wrapper1);
    context.addChild(wrapper2);

    LifecycleListener listener = new SimpleContextConfig();
    ((Lifecycle) context).addLifecycleListener(listener);

    Host host = new StandardHost();
    host.addChild(context);
    host.setName("localhost");
    host.setAppBase("webapps");

    Loader loader = new WebappLoader();
    context.setLoader(loader);
    // context.addServletMapping(pattern, name);
    context.addServletMapping("/Primitive", "Primitive");
    context.addServletMapping("/Modern", "Modern");

    Engine engine = new StandardEngine();
    engine.addChild(host);
    engine.setDefaultHost("localhost");

    Service service = new StandardService();
    service.setName("Stand-alone Service");
    Server server = new StandardServer();
    server.addService(service);
    service.addConnector(connector);

    //StandardService class's setContainer will call all its connector's setContainer method
    service.setContainer(engine);

    // Start the new server
    if (server instanceof Lifecycle) {
      try {
        server.initialize();
        ((Lifecycle) server).start();
        server.await();
        // the program waits until the await method returns,
        // i.e. until a shutdown command is received.
      }
      catch (LifecycleException e) {
        e.printStackTrace(System.out);
      }
    }

    // Shut down the server
    if (server instanceof Lifecycle) {
      try {
        ((Lifecycle) server).stop();
      }
      catch (LifecycleException e) {
        e.printStackTrace(System.out);
      }
    }
  }
}
可见在Bootstrap类中使用了硬代码的方式写死,如果修改则需要改代码,重新编译,非常不方便。在Tomcat中使用一种更优雅的方式,即XML解析。XML中每一个元素都可以转为Java对象,元素的属性可以表示对象的成员变量。
在Tomcat中,使用了Apache Commons Digester包来解析XML文件,接下来将介绍该包的用法。
10.1 Apache Commons Digester
官方介绍:The Digester package lets you configure an XML->Java object mapping module which triggers certain actions called rules whenever a particular pattern of nested XML elements is recognized.
org.apache.commons.digester.Digester类是该包的主类。我们可以指定一系列规则,告知Digester在解析XML文件时,遇到element需要完成那些操作,诸如创建对象、设置属性、调用方法等。
在Digester中维护有一个stack,在XML中遇到一个对象时,可以选择将该对象压入栈中,然后对其进行某些操作。
此外,还有一个很重要的类是Rule类,在Rule类中有两个最重要的方法:begin和end,它们分别指的是在遇到一个element开始标签时执行的操作和遇到一个element结束标签时执行的操作。
在Digester包中预置了一些默认的Rule,比如用于创建对象的ObjectCreateRule ,用于设置成员属性的SetPropertiesRule,以及用于调用方法的CallMethodRule,以及用于设置两个element之间关系的SetNextRule。
以ObjectCreateRule为例,可见其begin方法创建了一个对象,并且压入了栈中。end方法将该对象从栈中弹出。
@Override
public void begin(Attributes attributes) throws Exception {

  // Identify the name of the class to instantiate
  String realClassName = className;
  if (attributeName != null) {
    String value = attributes.getValue(attributeName);
    if (value != null) {
      realClassName = value;
    }
  }
  if (digester.log.isDebugEnabled()) {
    digester.log.debug("[ObjectCreateRule]{" + digester.match +
                       "}New " + realClassName);
  }

  // Instantiate the new object and push it on the context stack
  Class<?> clazz = digester.getClassLoader().loadClass(realClassName);
  Object instance = clazz.newInstance();
  digester.push(instance);

}


/**
 * Process the end of this element.
 */
@Override
public void end() throws Exception {

  Object top = digester.pop();
  if (digester.log.isDebugEnabled()) {
    digester.log.debug("[ObjectCreateRule]{" + digester.match +
                       "} Pop " + top.getClass().getName());
  }

}
其余默认方法原理类似,当然也可以自己继承Rule类,编写自己的规则。
一个Demo如下所示:
<?xml version="1.0" encoding="ISO-8859-1"?>
<employee firstName="Freddie" lastName="Mercury">
  <office description="Headquarters">
    <address streetName="Wellington Avenue" streetNumber="223"/>
  </office>
  <office description="Client site">
    <address streetName="Downing Street" streetNumber="10"/>
  </office>
</employee>
public class Test02 {

  public static void main(String[] args) {
    String path = System.getProperty("user.dir") + File.separator  + "etc";
    File file = new File(path, "employee2.xml");
    Digester digester = new Digester();
    // add rules
    digester.addObjectCreate("employee", "ex15.pyrmont.digestertest.Employee");
    digester.addSetProperties("employee");
    digester.addObjectCreate("employee/office", "ex15.pyrmont.digestertest.Office");
    digester.addSetProperties("employee/office");
    digester.addSetNext("employee/office", "addOffice");
    digester.addObjectCreate("employee/office/address",
      "ex15.pyrmont.digestertest.Address");
    digester.addSetProperties("employee/office/address");
    digester.addSetNext("employee/office/address", "setAddress");
    try {
      Employee employee = (Employee) digester.parse(file);
      ArrayList offices = employee.getOffices();
      Iterator iterator = offices.iterator();
      System.out.println("-------------------------------------------------");
      while (iterator.hasNext()) {
        Office office = (Office) iterator.next();
        Address address = office.getAddress();
        System.out.println(office.getDescription());
        System.out.println("Address : " +
          address.getStreetNumber() + " " + address.getStreetName());
        System.out.println("--------------------------------");
      }

    }
    catch(Exception e) {
      e.printStackTrace();
    }
  }
}
10.2 ContextConfig
ContextConfig是StandardContext中的一个LifecycleListener,该对象用于配置Context的一些属性,并设置其成员变量configured为true。ContextConfig为每一个servlet元素创建一个StandardWrapper对象,我们不再需要手动初始化wrapper。
在事件响应方法lifecycleEvent中,START_EVENT和STOP_EVENT会触发函数
public void lifecycleEvent(LifecycleEvent event) {
  ...
  // Process the event that has occurred
  if (event.getType().equals(Lifecycle.START_EVENT)) {
    start();
  } else if (event.getType().equals(Lifecycle.STOP_EVENT)) {
    stop();
  }
}
在start方法中,涉及到xml解析以及属性注入的方法如下
private synchronized void start() {
	...
  // Process the default and application web.xml files
  // 解析default web.xml, 该xml在%CATALINE_HOME%/conf目录下
  defaultConfig();
  // 解析application web.xml, 该xml在WEB-INF
  applicationConfig();
  ...
}
defaultConfig()方法就是解析默认的web.xml,applicationConfig()方法是解析WEB-INF下的web.xml。
private void defaultConfig() {

  // Open the default web.xml file, if it exists
  File file = new File(Constants.DefaultWebXml);
  if (!file.isAbsolute()) {
    file = new File(System.getProperty("catalina.base"),
                    Constants.DefaultWebXml);
  }
  FileInputStream stream = null;
  try {
    stream = new FileInputStream(file.getCanonicalPath());
    stream.close();
    stream = null;
  } catch (FileNotFoundException e) {
    log(sm.getString("contextConfig.defaultMissing"));
    return;
  } catch (IOException e) {
    log(sm.getString("contextConfig.defaultMissing"), e);
    return;
  }

  // Process the default web.xml file
  // 锁住Digester对象
  synchronized (webDigester) {
    try {
      InputSource is =
        new InputSource("file://" + file.getAbsolutePath());
      stream = new FileInputStream(file);
      is.setByteStream(stream);
      webDigester.setDebug(getDebug());
      if (context instanceof StandardContext) {
        ((StandardContext) context).setReplaceWelcomeFiles(true);
      }
      webDigester.clear();
      webDigester.push(context);
      webDigester.parse(is);
    } catch (SAXParseException e) {
      log(sm.getString("contextConfig.defaultParse"), e);
      log(sm.getString("contextConfig.defaultPosition",
                       "" + e.getLineNumber(),
                       "" + e.getColumnNumber()));
      ok = false;
    } catch (Exception e) {
      log(sm.getString("contextConfig.defaultParse"), e);
      ok = false;
    } finally {
      try {
        if (stream != null) {
          stream.close();
        }
      } catch (IOException e) {
        log(sm.getString("contextConfig.defaultClose"), e);
      }
    }
  }
}
webDigester是ContextConfig的一个成员变量,其通过createWebDigester()方法初始化
private static Digester createWebDigester() {

  URL url = null;
  Digester webDigester = new Digester();
  webDigester.setValidating(true);
  url = ContextConfig.class.getResource(Constants.WebDtdResourcePath_22);
  webDigester.register(Constants.WebDtdPublicId_22,
                       url.toString());
  url = ContextConfig.class.getResource(Constants.WebDtdResourcePath_23);
  webDigester.register(Constants.WebDtdPublicId_23,
                       url.toString());
  // 这里是解析规则
  webDigester.addRuleSet(new WebRuleSet());
  return (webDigester);

}
其中WebRuleSet即各种规则的集合。
11. 关闭钩子
JVM在以下两种情况下关闭:
- 当System.exit被调用或者当最后一个非守护线程退出
- 使用者强制JVM退出,例如输入
CTRL+C
当虚拟机关闭的时候,会在Runtime中并行的执行注册的关闭钩子(每个都占一个线程)。
注册钩子函数的方法如下:
- 继承Thread类,并重新run方法,其内容为钩子逻辑
- 初始化钩子类
- 通过Runtime.addShutdownHook方法注册钩子函数
举例:
public class ShutdownHookDemo {

  public void start() {
    System.out.println("Demo");
    ShutdownHook ShutdownHook = new ShutdownHook();
    Runtime.getRuntime().addShutdownHook(ShutdownHook);
  }
  public static void main(String[] args) {
    ShutdownHookDemo demo = new ShutdownHookDemo();
    demo.start();
    try {
      System.in.read();
    } catch(Exception e) {
    }
  }
  class ShutdownHook extends Thread {
    public void run() {
      System.out.println("Shutting down");
    }
  }
}
12. Tomcat启动
有两个类与Tomcat启动有关,分别为Catalina和Bootstrap。
Catalina用于解析server.xml文件,并start和stop Server对象。
Bootstrap有一个入口函数,使用类加载器去加载Catalina类,并实例化。
逻辑上Catalina类和Bootstrap类可以合并,但为了适配各种启动环境,以及运行模式,可能存在多个Bootstrap,因此让启动入口Bootstrap与Tomcat核心环境完全松耦合。
13. Tomcat 4 框架总结