熟悉Spring Bean的生命周期可以加深我们对Spring的理解,对于Spring的一些扩展操作也会有更加清晰的认识。
1. 整体流程
Bean的生成过程如下图所示:
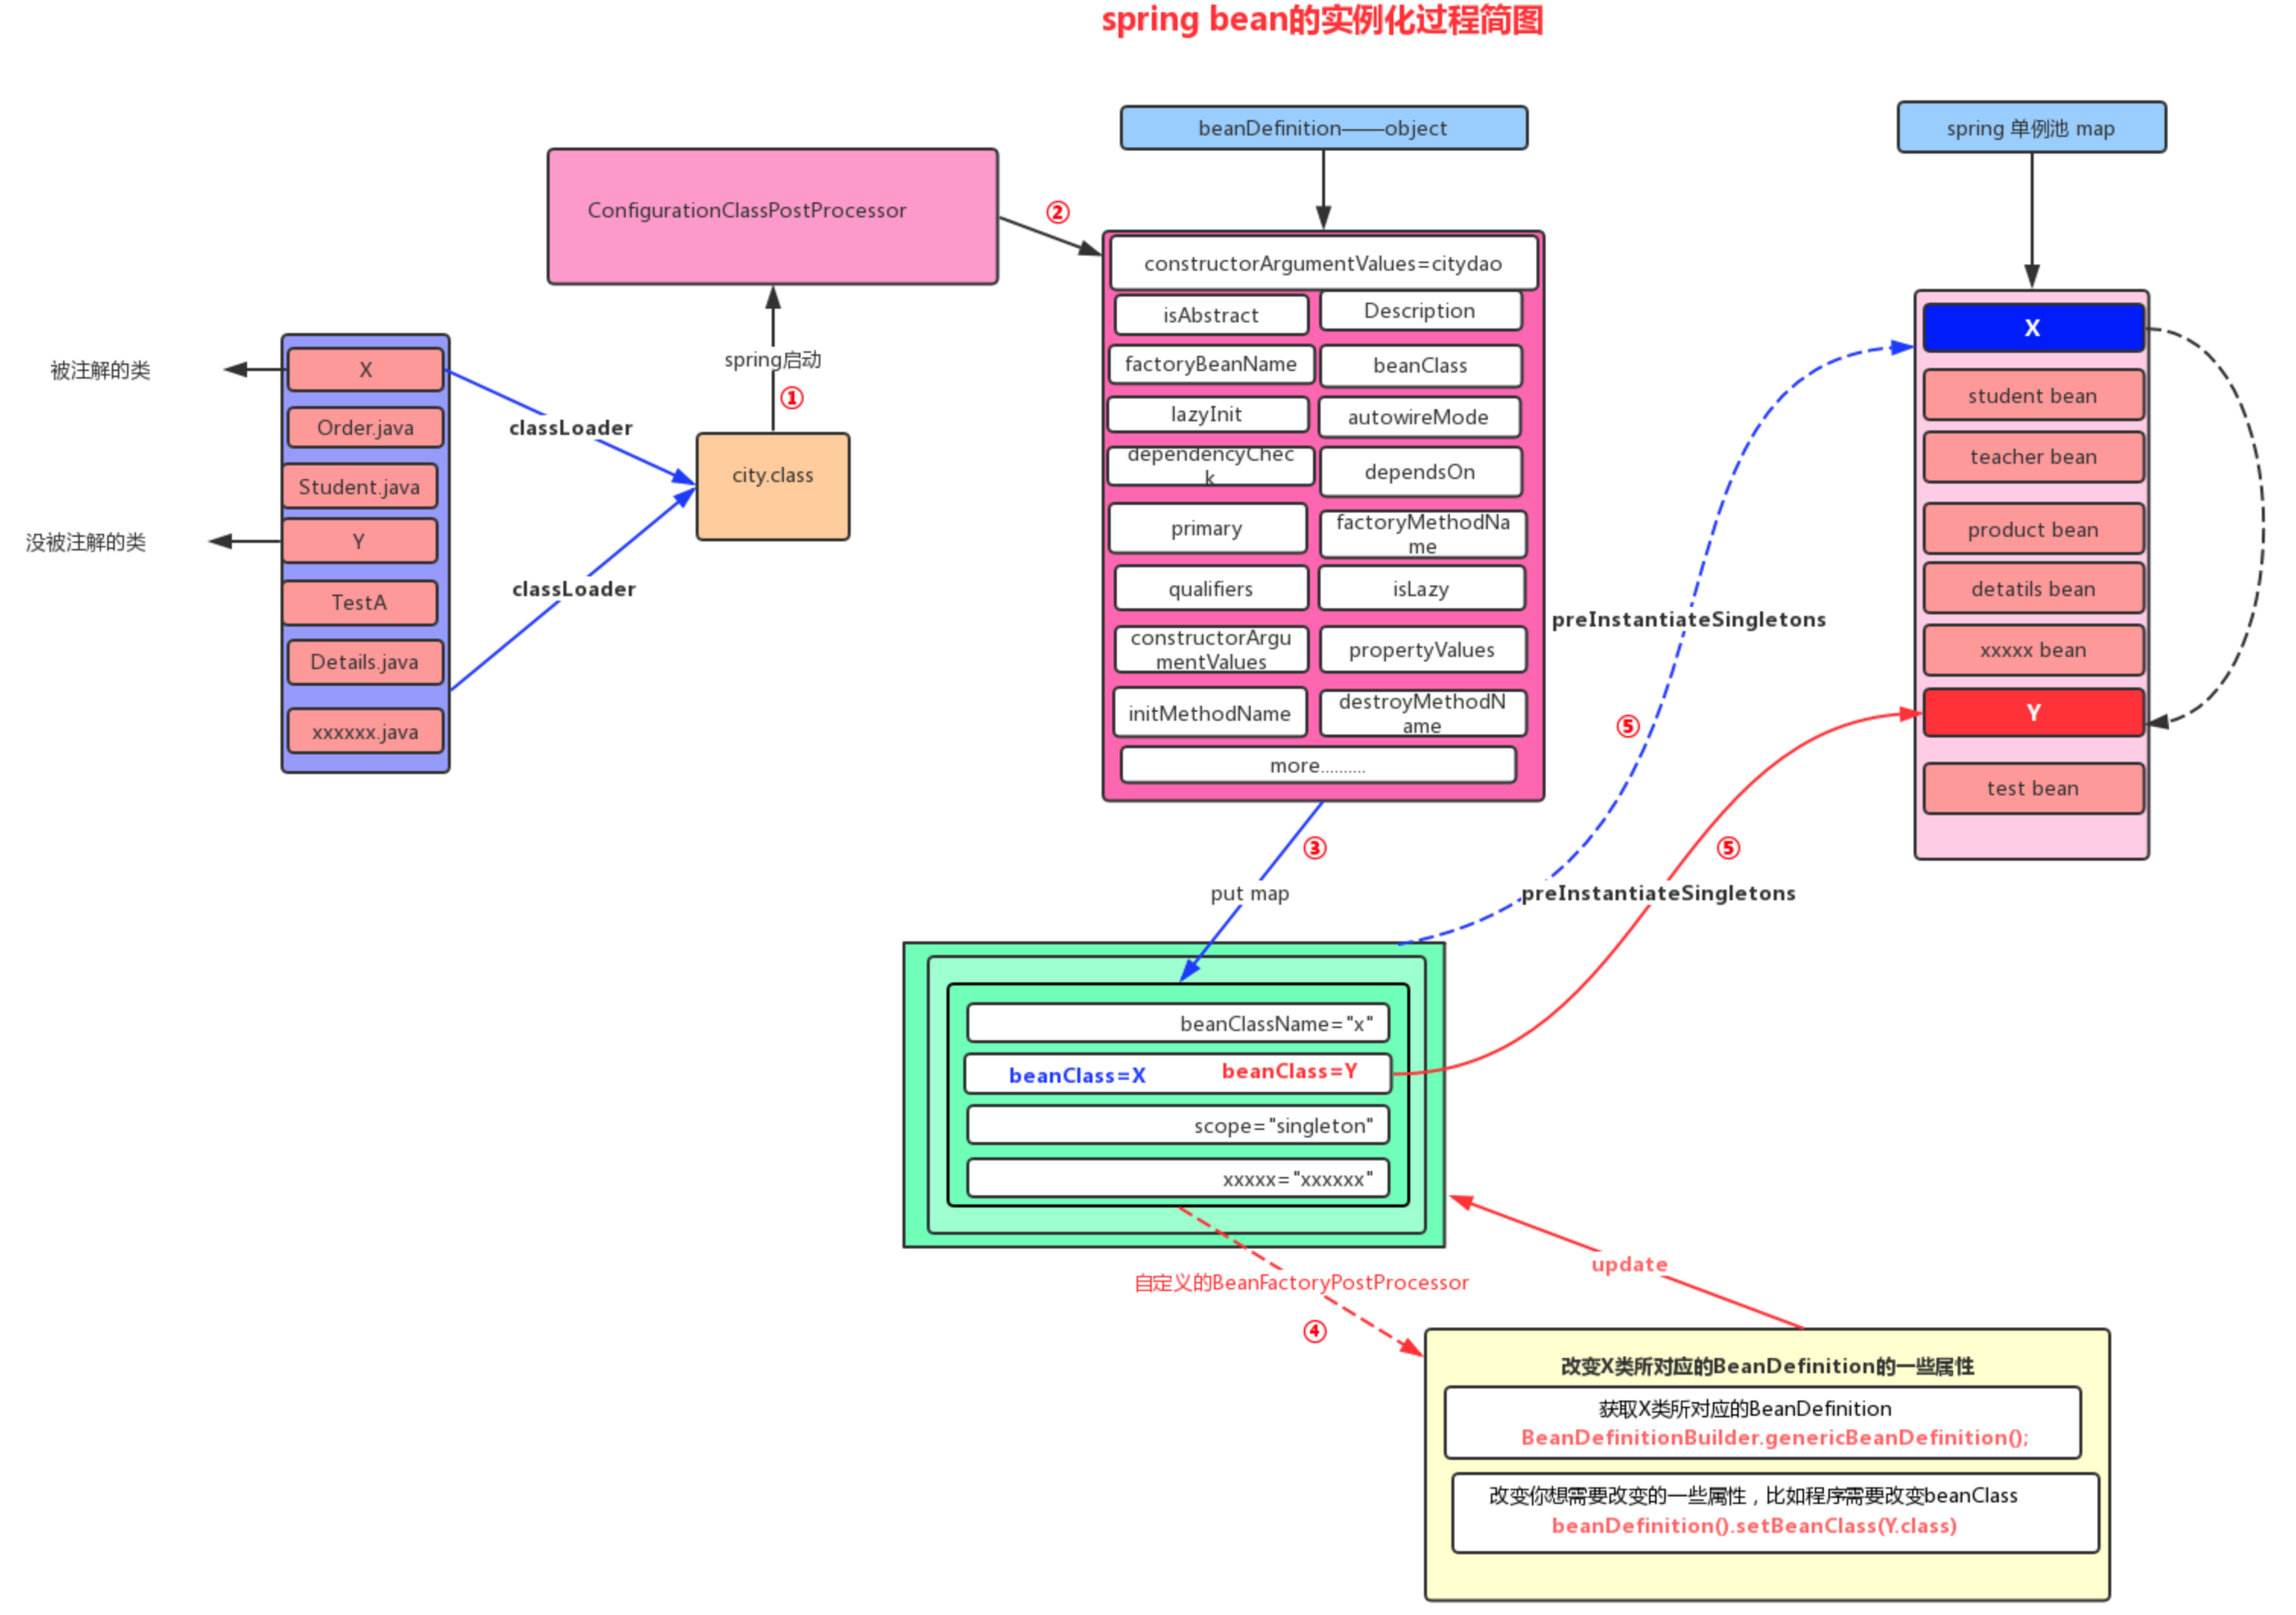
- Spring启动后,在bdMap中注册开天辟地的五个类,其中有很重要的ConfigurationClassPostProcessor
- ConfigurationClassPostProcessor会进行扫描,为扫描到的类生成一个beanDefinition对象
- 把beanDefinition对象和生成的beanName放到bdMap中
- 执行beanFactoryPostProcessor,可以修改beanDefinition信息
- 初始化bean对象
2. BeanDefinition的扫描及生成
2.1 BeanDefinition的定义
beanDefinition是Spring bean对象的元信息,是描述bean对象的类,类似于Java中的Class类,最原始的Spring中直接对BeanDefinition进行配置
BeanDefinition中的各种属性等同于XML文件中bean标签中的各种key值。
2.2 BeanFactoryPostProcessor
2.2.1 BeanFacotryPostProcessor接口
BeanFactoryPostProcessor是一个很重要的接口,它和它的子类可以共同干预Bean工厂的生产,影响BeanDefinition的属性以及注册。
public interface BeanFactoryPostProcessor {

	/**
	 * Modify the application context's internal bean factory after its standard
	 * initialization. All bean definitions will have been loaded, but no beans
	 * will have been instantiated yet. This allows for overriding or adding
	 * properties even to eager-initializing beans.
	 * @param beanFactory the bean factory used by the application context
	 * @throws org.springframework.beans.BeansException in case of errors
	 */
	void postProcessBeanFactory(ConfigurableListableBeanFactory beanFactory) throws BeansException;
}

public interface BeanDefinitionRegistryPostProcessor extends BeanFactoryPostProcessor {

	/**
	 * Modify the application context's internal bean definition registry after its
	 * standard initialization. All regular bean definitions will have been loaded,
	 * but no beans will have been instantiated yet. This allows for adding further
	 * bean definitions before the next post-processing phase kicks in.
	 * @param registry the bean definition registry used by the application context
	 * @throws org.springframework.beans.BeansException in case of errors
	 */
	void postProcessBeanDefinitionRegistry(BeanDefinitionRegistry registry) throws BeansException;

}
BeanFactoryPostProcessor这个接口只有一个方法postProcessBeanFactory()。它接收一个ConfigurableListableBeanFactory对象,有了这个工厂对象我们自然可以操作beanFactory对其进行一些处理,这就是bean工厂后置处理器的由来。
其子接口BeanDefinitionRegistryPostProcessor有一个方法postProcessBeanDefinitionRegistry(),通过方法的注释可以了解到,该方法是用来影响bd注册过程的。
2.2.2 BeanFactoryPostProcessor的执行时机
Spring容器基类AbstractApplicationContext中的refresh()方法(省略无关代码),该方法是Spring容器执行的模板
@Override
public void refresh() throws BeansException, IllegalStateException {
    // Prepare this context for refreshing.
    prepareRefresh();

    // Tell the subclass to refresh the internal bean factory.
    ConfigurableListableBeanFactory beanFactory = obtainFreshBeanFactory();

    // Prepare the bean factory for use in this context.
    prepareBeanFactory(beanFactory);

    // Allows post-processing of the bean factory in context subclasses.
    postProcessBeanFactory(beanFactory);

    // Invoke factory processors registered as beans in the context.
    // 执行BeanDefinitionRegistryPostProcessor的接口方法将bd扫描进map
    // 执行BeanFacotoryPostProcessor的接口方法进行beanFactory后置处理
    invokeBeanFactoryPostProcessors(beanFactory);

    // Register bean processors that intercept bean creation.
    registerBeanPostProcessors(beanFactory);

    // Initialize message source for this context.
    initMessageSource();

    // Initialize event multicaster for this context.
    initApplicationEventMulticaster();

    // Initialize other special beans in specific context subclasses.
    onRefresh();

    // Check for listener beans and register them.
    registerListeners();

    // Instantiate all remaining (non-lazy-init) singletons.
    finishBeanFactoryInitialization(beanFactory);

    // Last step: publish corresponding event.
    finishRefresh();
}
与BeanDefinition扫描相关的代码是invokeBeanFactoryPostProcessor()这一行。
	protected void invokeBeanFactoryPostProcessors(ConfigurableListableBeanFactory beanFactory) {
		PostProcessorRegistrationDelegate.invokeBeanFactoryPostProcessors(beanFactory, getBeanFactoryPostProcessors());
		...
	}
在这个静态方法中又调用了PostProcessorRegistrationDelegate的静态方法,该方法的入参是bean工厂以及通过getBeanFactoryPostProcessor()得到的bean工厂后置处理器,值得注意的是,这里拿到的bean工厂后置处理器是通过ac.addBeanFactoryPostProcessor所添加的。
	// 找到,并执行BeanDefinitionRegistryPostProcessor和BeanFactoryPostProcessor的方法
	// 1.beanFactoryPostProcessors没有元素
	// 2.有元素 ac.addBeanFactoryPostProcessor进行添加
	public static void invokeBeanFactoryPostProcessors(
			ConfigurableListableBeanFactory beanFactory, List<BeanFactoryPostProcessor> beanFactoryPostProcessors) {

		// Invoke BeanDefinitionRegistryPostProcessors first, if any.
		// 记录已处理过的Beans
		Set<String> processedBeans = new HashSet<>();
		// 进入该分支
		if (beanFactory instanceof BeanDefinitionRegistry) {
      // 向上转型
			BeanDefinitionRegistry registry = (BeanDefinitionRegistry) beanFactory;
			List<BeanFactoryPostProcessor> regularPostProcessors = new ArrayList<>();
			List<BeanDefinitionRegistryPostProcessor> registryProcessors = new ArrayList<>();

			// 处理通过ac.addBeanFacotoryPostProcessor添加的beanFactoryPostProcessor
			for (BeanFactoryPostProcessor postProcessor : beanFactoryPostProcessors) {
        // 如果是BDRegistryPostProcessor,则执行并放入已注册列表中(registryProcessors)
				if (postProcessor instanceof BeanDefinitionRegistryPostProcessor) {
					BeanDefinitionRegistryPostProcessor registryProcessor =
							(BeanDefinitionRegistryPostProcessor) postProcessor;
					registryProcessor.postProcessBeanDefinitionRegistry(registry);
					registryProcessors.add(registryProcessor);
				} else {
          // 否则直接放入到regularPostProcessors中
					regularPostProcessors.add(postProcessor);
				}
			}

			// 用于盛放当前已经注册的Processors
			List<BeanDefinitionRegistryPostProcessor> currentRegistryProcessors = new ArrayList<>();

      // 寻找实现了BeanDefinitionRegistryPostProcessor的类
			String[] postProcessorNames =
					beanFactory.getBeanNamesForType(BeanDefinitionRegistryPostProcessor.class, true, false);
      // 寻找实现了PriorityOrdered接口的BeanDefinitionRegistryPostProcessor类,并执行器接口方法
      // ConfigurationClassPostProcessor的postProcessBeanDefinitionRegistry方法会在这里执行
			for (String ppName : postProcessorNames) {
				if (beanFactory.isTypeMatch(ppName, PriorityOrdered.class)) {
					currentRegistryProcessors.add(
							beanFactory.getBean(ppName, BeanDefinitionRegistryPostProcessor.class));
					processedBeans.add(ppName);
				}
			}
			// 对processor进行排序
			sortPostProcessors(currentRegistryProcessors, beanFactory);
			registryProcessors.addAll(currentRegistryProcessors);
			// 执行完这一步完成bd的注册 ConfigurationClassProcessor
			invokeBeanDefinitionRegistryPostProcessors(currentRegistryProcessors, registry);
			currentRegistryProcessors.clear();

			// 寻找实现了Ordered接口的BeanDefinitionRegistryPostProcessor类,并执行其接口方法
      ...
      // 寻找剩余的BeanDefinitionRegistryPostProcessor类,并执行其接口方法
			// @Comporent, @Import 等
			boolean reiterate = true;
			while (reiterate) {
				reiterate = false;
				postProcessorNames = beanFactory.getBeanNamesForType(BeanDefinitionRegistryPostProcessor.class, true,
						false);
				for (String ppName : postProcessorNames) {
					if (!processedBeans.contains(ppName)) {
						currentRegistryProcessors.add(
								beanFactory.getBean(ppName, BeanDefinitionRegistryPostProcessor.class));
						processedBeans.add(ppName);
						// 因为下文执行了BDRegistryPostProcessors的接口方法后后有可能注册新的bd,所以要把reiterate置为true,继续扫描新的BDRegistryPostProcessors
						reiterate = true;
					}
				}
				sortPostProcessors(currentRegistryProcessors, beanFactory);
				registryProcessors.addAll(currentRegistryProcessors);
				invokeBeanDefinitionRegistryPostProcessors(currentRegistryProcessors, registry);
				currentRegistryProcessors.clear();
			}

			// 接下来
			invokeBeanFactoryPostProcessors(registryProcessors, beanFactory);
			invokeBeanFactoryPostProcessors(regularPostProcessors, beanFactory);
		} else {
			// Invoke factory processors registered with the context instance.
			invokeBeanFactoryPostProcessors(beanFactoryPostProcessors, beanFactory);
		}

		// Do not initialize FactoryBeans here: We need to leave all regular beans
		// uninitialized to let the bean factory post-processors apply to them!
		// 找到BeanFactoryPostProcessor并执行方法
		String[] postProcessorNames =
				beanFactory.getBeanNamesForType(BeanFactoryPostProcessor.class, true, false);

		// Separate between BeanFactoryPostProcessors that implement PriorityOrdered,
		// Ordered, and the rest.
		List<BeanFactoryPostProcessor> priorityOrderedPostProcessors = new ArrayList<>();
		List<String> orderedPostProcessorNames = new ArrayList<>();
		List<String> nonOrderedPostProcessorNames = new ArrayList<>();
		for (String ppName : postProcessorNames) {
			if (processedBeans.contains(ppName)) {
				// skip - already processed in first phase above
			} else if (beanFactory.isTypeMatch(ppName, PriorityOrdered.class)) {
				priorityOrderedPostProcessors.add(beanFactory.getBean(ppName, BeanFactoryPostProcessor.class));
			} else if (beanFactory.isTypeMatch(ppName, Ordered.class)) {
				orderedPostProcessorNames.add(ppName);
			} else {
				nonOrderedPostProcessorNames.add(ppName);
			}
		}

		// First, invoke the BeanFactoryPostProcessors that implement PriorityOrdered.
		sortPostProcessors(priorityOrderedPostProcessors, beanFactory);
		invokeBeanFactoryPostProcessors(priorityOrderedPostProcessors, beanFactory);

		// Next, invoke the BeanFactoryPostProcessors that implement Ordered.
		List<BeanFactoryPostProcessor> orderedPostProcessors = new ArrayList<>();
		for (String postProcessorName : orderedPostProcessorNames) {
			orderedPostProcessors.add(beanFactory.getBean(postProcessorName, BeanFactoryPostProcessor.class));
		}
		sortPostProcessors(orderedPostProcessors, beanFactory);
		invokeBeanFactoryPostProcessors(orderedPostProcessors, beanFactory);

		// Finally, invoke all other BeanFactoryPostProcessors.
		List<BeanFactoryPostProcessor> nonOrderedPostProcessors = new ArrayList<>();
		for (String postProcessorName : nonOrderedPostProcessorNames) {
			nonOrderedPostProcessors.add(beanFactory.getBean(postProcessorName, BeanFactoryPostProcessor.class));
		}
		invokeBeanFactoryPostProcessors(nonOrderedPostProcessors, beanFactory);

		// Clear cached merged bean definitions since the post-processors might have
		// modified the original metadata, e.g. replacing placeholders in values...
		beanFactory.clearMetadataCache();
	}
2.2.3 ConfigurationClassPostProcessor类
在我们了解了BeanFactoryPostProcessor接口以及执行时机后,接下来要介绍一个它非常重要的实例,ConfigurationClassPostProcessor。
一个Spring容器的启动入口如下所示:
public class Main {

	public static void main(String[] args) {
		AnnotationConfigApplicationContext ac = new AnnotationConfigApplicationContext(AppConfig.class);
	}
}
其中AnnotationConfigApplicationContext的初始化过程如下:
public AnnotationConfigApplicationContext(Class<?>... componentClasses) {
  // step 1. 调用无参构造函数
  this();
  // step 3. 将AppConfig.class包装成AnnotatedGenericBeanDefinition注册到bean工厂的bdMap中
  register(componentClasses);
  // step 4. 调用基类AbstractApplicationContext的refresh方法,该方法是容器启动核心方法
  refresh();
}

public AnnotationConfigApplicationContext() {
  // step 2. 完成了Spring开天辟地的五个bd放入到bdMap(完成初始工厂后置处理器的注册)
  this.reader = new AnnotatedBeanDefinitionReader(this);
  this.scanner = new ClassPathBeanDefinitionScanner(this);
}
在this.reader赋完值后,可见bdMap中已经初始化好了五个内置的bd
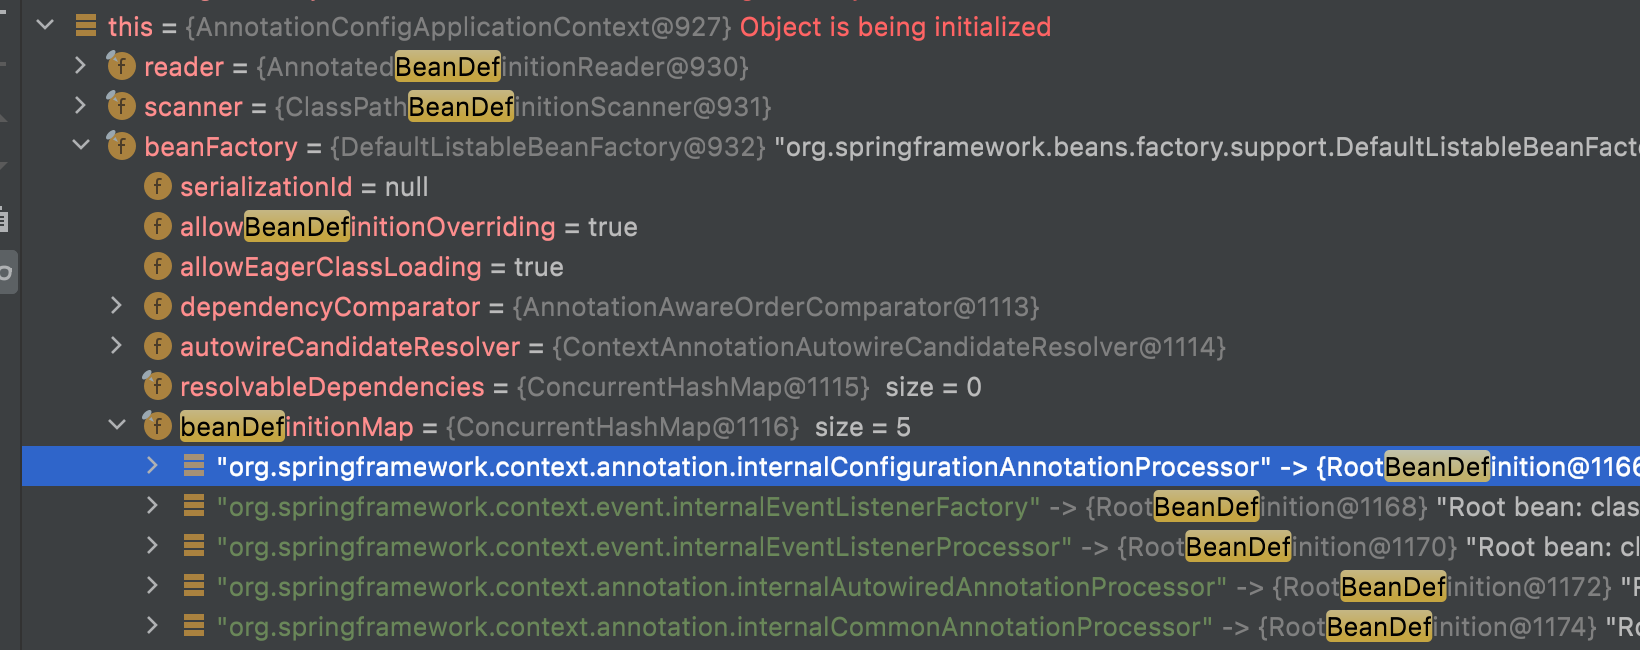
其中有一个很重要的类是ConfigurationClassPostProcessor。
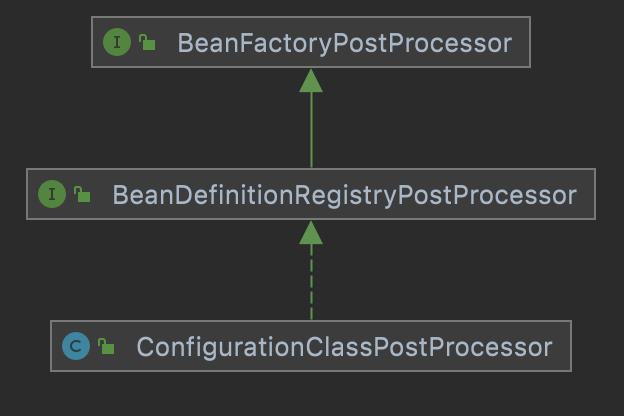
该类继承了BeanDefinitionRegistryPostProcessor这个接口,而其父接口是BeanFactoryPostProcessor。
其中,在执行完BeanDefinitionRegistryPostProcessor接口的postProcessBeanDefinitionRegistry方法后,会将所有的bean扫描到beanFactory中。而在执行完BeanFactoryPostProcessor接口的postProcessBeanFactory方法后,会将被@Configuration注释的类使用CGLIB代理,替换掉其bd中的beanClass为CGLIB代理后的class,其作用如下:
@Configuration
// 使用了@Configuration表明是一个全注解类,会对其进行CGLIB代理
public class AppConfig {

	@Bean
	public E e() {
		return new E();
	}

	@Bean
	// factory method
	public F f() {
		// 这里e()不会执行,因为通过cglib修改了这里
		// 检查当前方法是否与正在执行的工厂方法一致,不一致则执行cglib的方法
		e();
		return new F();
	}

}

public class F {
	{
		System.out.println("F init");
	}
}

public class E {
	{
		System.out.println("E init");
	}
}
如果AppConfig类没有加@Configuration,会打印两次“E init”。但是如果加上了@Configuration则只会打印一次,即E只被初始化了一次。这是因为在ConfigurationClassPostProcessor的postProcessorBeanFactory方法中,会对全配置类生成代理类,然后修改bd中对应的beanClass。
	// 主要做的事情 通过cglib
	public void postProcessBeanFactory(ConfigurableListableBeanFactory beanFactory) {
		int factoryId = System.identityHashCode(beanFactory);
		if (this.factoriesPostProcessed.contains(factoryId)) {
			throw new IllegalStateException(
					"postProcessBeanFactory already called on this post-processor against " + beanFactory);
		}
		this.factoriesPostProcessed.add(factoryId);
		if (!this.registriesPostProcessed.contains(factoryId)) {
			// BeanDefinitionRegistryPostProcessor hook apparently not supported...
			// Simply call processConfigurationClasses lazily at this point then.
			processConfigBeanDefinitions((BeanDefinitionRegistry) beanFactory);
		}

		// 使用cglib动态代理全配置类
		enhanceConfigurationClasses(beanFactory);
		beanFactory.addBeanPostProcessor(new ImportAwareBeanPostProcessor(beanFactory));
	}
CGLIB是基于继承的代理方式,在调用原类方法的时候,会先触发设置好的拦截器,可以在拦截器中实现逻辑完成对原类的增强。对@Configuration代理类的拦截器如下:
	// The callbacks to use. Note that these callbacks must be stateless.
	private static final Callback[] CALLBACKS = new Callback[]{
			new BeanMethodInterceptor(),
			new BeanFactoryAwareMethodInterceptor(),
			NoOp.INSTANCE
	};
其中BeanMethodInterceptor方法实现了不重复生成类的逻辑,简化代码如下所示,根据当前调用的方法是否为正在调用的工厂方法来决定执行原方法还是代理方法。
	public Object intercept(Object enhancedConfigInstance, Method beanMethod, Object[] beanMethodArgs,
				MethodProxy cglibMethodProxy) throws Throwable {

			...

			// 判断cglib拦截器拦截的方法和在ThreadLocal中的工厂方法是否是同一个
			// 如果是同一个方法则直接调用父方法(原方法)cglibMethodProxy.invokeSuper
			// 否则调用resolveBeanReference代理方法
			if (isCurrentlyInvokedFactoryMethod(beanMethod)) {
				// The factory is calling the bean method in order to instantiate and register the bean
				// (i.e. via a getBean() call) -> invoke the super implementation of the method to actually
				// create the bean instance.
				return cglibMethodProxy.invokeSuper(enhancedConfigInstance, beanMethodArgs);
			}
			return resolveBeanReference(beanMethod, beanMethodArgs, beanFactory, beanName);
		}
例如在执行f()方法时,f()方法被@Bean注释是一个工厂方法(factoryMethod)。在生成bd的时候,f的factoryMethodName会被赋为f, factoryBeanName被赋为appConfig。
在初始化该bd的时候就会去调用f方法,在调用f方法前,会先将f放入到currentlyInvokedFactoryMethod这个ThreadLocal局部变量中。然后调用f方法会被CGLIB代理拦截。因为当前执行的方法f和currentlyInvokedFactoryMethod中的方法名一致,因此直接调用原方法。
在原方法中调用方法e()。调用e方法同样被拦截,再次进入上面的intercept方法。此时beanMethod是e但是currentlyInvokedFactoryMethod中的方法是f,不一致,因此就进入了代理方法。在代理方法中不再重新构造一个e而是返回已经构造好的bean。
3. Bean的生命周期
Bean 的生命周期概括起来就是 4 个阶段:
- 实例化(Instantiation)
- 属性赋值(Populate)
- 初始化(Initialization)
- 销毁(Destruction)
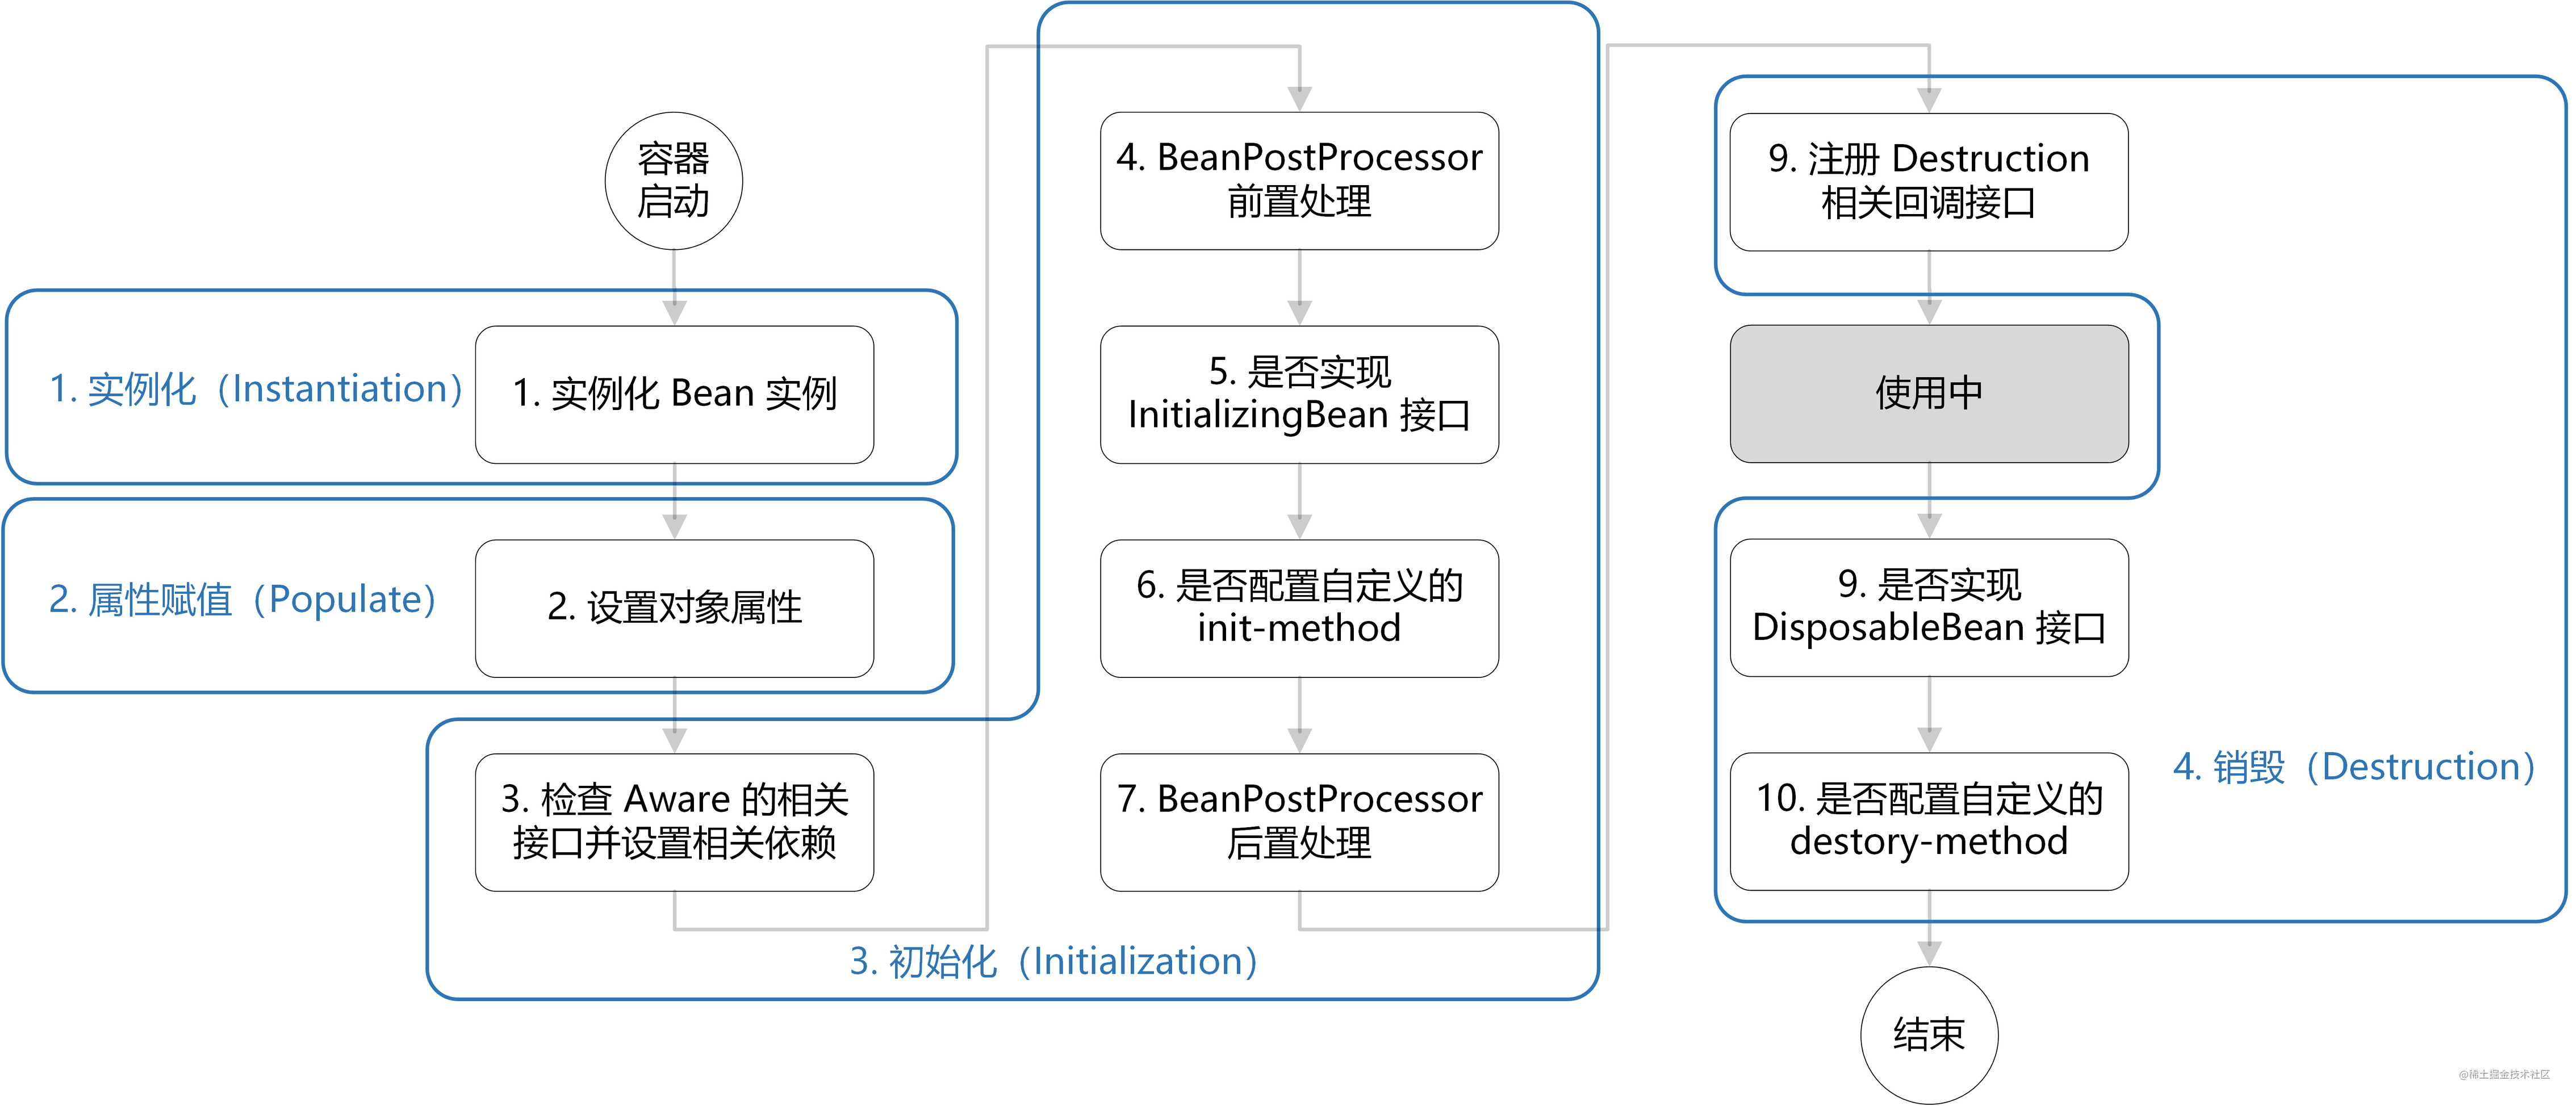
- 实例化:第 1 步,实例化一个 bean 对象;
- 属性赋值:第 2 步,为 bean 设置相关属性和依赖;
- 初始化:第 3~7 步,步骤较多,其中第 5、6 步为初始化操作,第 3、4 步为在初始化前执行,第 7 步在初始化后执行,该阶段结束,才能被用户使用;
- 销毁:第 8~10步,第8步不是真正意义上的销毁(还没使用呢),而是先在使用前注册了销毁的相关调用接口,为了后面第9、10步真正销毁 bean 时再执行相应的方法。
下面我们结合代码来直观的看下,在 doCreateBean() 方法中能看到依次执行了这 4 个阶段:
// AbstractAutowireCapableBeanFactory.java
protected Object doCreateBean(final String beanName, final RootBeanDefinition mbd, final @Nullable Object[] args)
    throws BeanCreationException {

    // 1. 实例化
    BeanWrapper instanceWrapper = null;
    if (instanceWrapper == null) {
        instanceWrapper = createBeanInstance(beanName, mbd, args);
    }

  	// Eagerly cache singletons to be able to resolve circular references
		// even when triggered by lifecycle interfaces like BeanFactoryAware.
		// 判断是否允许循环依赖
		boolean earlySingletonExposure = (mbd.isSingleton() && this.allowCircularReferences &&
				isSingletonCurrentlyInCreation(beanName));
		if (earlySingletonExposure) {
			// 第四次调用后置处理器 ,判断是否进行aop
			// 支持循环依赖,提前暴露bean工厂
			addSingletonFactory(beanName, () -> getEarlyBeanReference(beanName, mbd, bean));
		}

    Object exposedObject = bean;
    try {
        // 2. 属性赋值
        populateBean(beanName, mbd, instanceWrapper);
        // 3. 初始化
        exposedObject = initializeBean(beanName, exposedObject, mbd);
    }

    // 4. 销毁-注册回调接口
    try {
        registerDisposableBeanIfNecessary(beanName, bean, mbd);
    }

    return exposedObject;
}
由于初始化包含了第 3~7步,较复杂,所以我们进到 initializeBean() 方法里具体看下其过程(注释的序号对应图中序号):
// AbstractAutowireCapableBeanFactory.java
protected Object initializeBean(final String beanName, final Object bean, @Nullable RootBeanDefinition mbd) {
    // 3. 检查 Aware 相关接口并设置相关依赖
    if (System.getSecurityManager() != null) {
        AccessController.doPrivileged((PrivilegedAction<Object>) () -> {
            invokeAwareMethods(beanName, bean);
            return null;
        }, getAccessControlContext());
    }
    else {
        invokeAwareMethods(beanName, bean);
    }

    // 4. BeanPostProcessor 前置处理
  	// @PostConstruct在这里执行
    Object wrappedBean = bean;
    if (mbd == null || !mbd.isSynthetic()) {
        wrappedBean = applyBeanPostProcessorsBeforeInitialization(wrappedBean, beanName);
    }

    // 5. 若实现 InitializingBean 接口,调用 afterPropertiesSet() 方法
    // 6. 若配置自定义的 init-method方法,则执行
    try {
        invokeInitMethods(beanName, wrappedBean, mbd);
    }
    catch (Throwable ex) {
        throw new BeanCreationException(
            (mbd != null ? mbd.getResourceDescription() : null),
            beanName, "Invocation of init method failed", ex);
    }
    // 7. BeanPostProceesor 后置处理
    if (mbd == null || !mbd.isSynthetic()) {
        wrappedBean = applyBeanPostProcessorsAfterInitialization(wrappedBean, beanName);
    }

    return wrappedBean;
}
此外,由于@PostConstruct是在applyBeanPostProcessorsBeforeInitialization中执行,init-method和afterPropertiesSet是在invokeInitMethods方法中执行,则其执行顺序是@PostConstruct->afterPropertiesSet->init-method。
4. 如何解决循环依赖
通过Spring Bean的生命周期,我们可以得知Bean会首先推断构造方法把自己new出来,然后再进行属性注入。但是如果一个bean A的属性依赖于bean B,而bean B的一个属性依赖bean A,这个问题该如何处理呢?
@Service
public class OrderService {

	@Autowired
	private UserService userService;

}

@Service
public class UserService {

	@Autowired
	private OrderService orderService;

}
假设先初始化OrderService再初始化UserService

详细过程可参考该博客:https://blog.csdn.net/java_lyvee/article/details/101793774